
Select a trading day to view all Scanner results, chart evidence, and market explanations.
6 Scanners Available
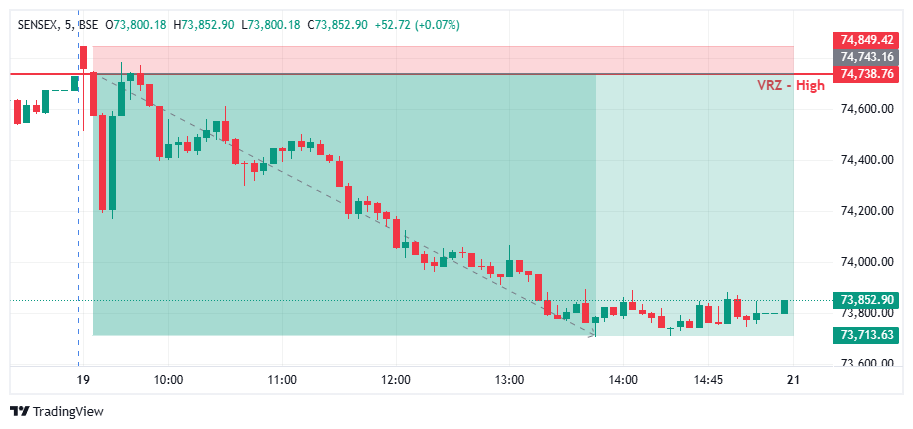

🔺 SENSEX approached the VRZ High resistance zone, as buyers attempted to sustain the upside breakout with increasing momentum.
⚠️ The breakout failed to hold above the VRZ High, signaling weakening buying pressure and a potential intraday reversal.
🔻 Price moved back below the breakout area, confirming a bearish Breakout Failure (BOF) setup with downside potential.
📉 Following the VRZ High rejection, sellers gradually regained control and started building consistent downside pressure.
🔻 SENSEX moved away from the resistance zone and developed a sustained bearish intraday price structure.
🎯 The bearish reversal eventually delivered a 1.38% downside move with an impressive 1:9.7 Risk-Reward.
🟢 Buyers: Attempted to push SENSEX above the VRZ High resistance, aiming to extend the bullish breakout.
🟠 Breakout Traders: Faced pressure as the breakout failed and price returned below the key resistance level.
🔴 Sellers: Regained market control and drove SENSEX into a stronger bearish intraday reversal.
💭 The initial breakout attempt created bullish expectations around the VRZ High resistance zone.
⚠️ Failure to sustain higher levels weakened the bullish structure and signaled a shift in short-term market sentiment.
📉 Momentum shifted toward sellers, supporting continued bearish price action and downside follow-through.
🎯 The 74,738.76 VRZ High acted as the primary resistance level and key reference zone for the BOF setup.
🔄 SENSEX rejected the resistance area instead of sustaining the breakout, creating a clear failed breakout pattern.
📊 This VRZ High rejection provided the technical basis for identifying the bearish SENSEX BOF setup.
✅ Price failed to maintain the breakout above the VRZ High, confirming weakness in the bullish breakout attempt.
🔻 Selling pressure increased as SENSEX moved lower from the rejection zone and established bearish price momentum.
⚡ Continued downside follow-through strengthened the Breakout Failure confirmation and intraday trade structure.
📉 SENSEX maintained a clear bearish intraday structure after the failed VRZ High breakout.
🔻 Lower price levels developed progressively as sellers continued to dominate the short-term market trend.
🏆 The setup ultimately produced a 1.38% bearish move with a strong 1:9.7 Risk-Reward outcome.
🎯 The VRZ High resistance provided a clearly defined technical reference for identifying the failed breakout setup.
🛡️ Structured risk management around the key resistance zone created an attractive 1:9.7 Risk-Reward opportunity.
🚀 Strong bearish follow-through from the VRZ High rejection significantly improved the overall BOF trade performance.
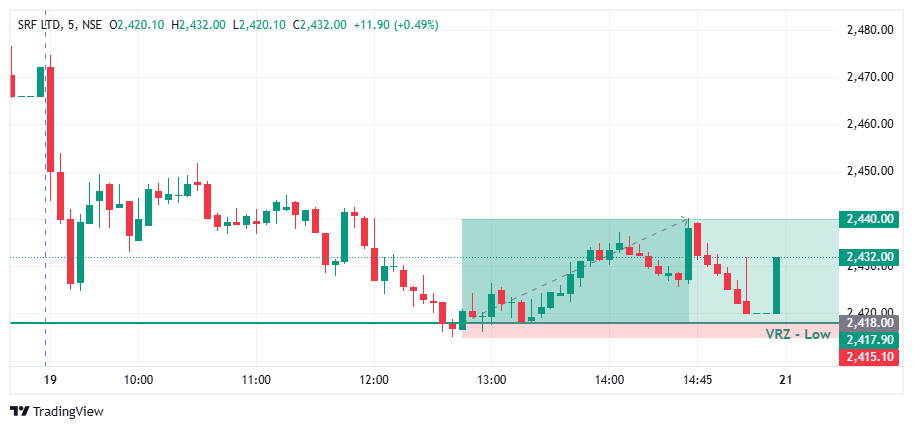

🔎 SRF faded after an early spike and slid steadily through the first half of the session.
⚠️ Price kept moving toward the ₹2,417.90 VRZ Low, where a breakdown looked likely.
🎯 The VRZ Low became the key technical reference for spotting a potential bullish Breakout Failure.
🔻 Price dipped below the ₹2,417.90 VRZ Low and tagged the ₹2,415.10 area, showing a clear attempt by sellers to extend the downside.
🚫 The move below support was shallow and could not hold.
🔄 Buyers stepped in right at the lows, forming the first base for a bullish reversal.
🎯 Price closed back above the ₹2,417.90 VRZ Low, confirming a Bullish Breakout Failure structure.
⚡ The failed breakdown showed that sellers had lost control below support.
📈 Once the level was reclaimed, short-term momentum shifted toward the buyers.
📈 After the VRZ Low rejection, SRF climbed steadily with higher lows and strong green candles.
⚡ Trapped sellers covered and buyers pushed price out of the breakdown zone into a bullish recovery.
💥 The rally extended to around ₹2,440.00, a 0.91% price expansion that confirmed the successful BOF outcome.
🔍 The chart shows a morning sell-off, a brief break of the ₹2,417.90 VRZ Low, and a clean recovery from the support area.
🟢 The reclaim of the zone was the key confirmation for the bullish BOF structure.
📈 Price then travelled up to the ₹2,440.00 area and held above the VRZ Low for the rest of the session.
🎯 The shift from breakdown pressure to bullish expansion was the defining technical event of this setup.
🔎 The main signal was the failed breakdown below the ₹2,417.90 VRZ Low.
⚡ Sellers pushed price under support, but the move lacked sustained follow-through.
🟢 The reclaim of the VRZ Low signalled a change in short-term price structure.
📈 Buyers then drove the recovery to higher levels, producing the reported 0.91% move.
🟢 VRZ Low: ₹2,417.90 served as the primary support reference.
🪤 Bear Trap: Sellers could not hold price below the support zone.
🛡️ Buyer Defense: Buyers responded strongly near the ₹2,415.10 low.
🔄 Bullish Reclaim: Price recovered back above the key level.
📊 Momentum Shift: Short-term momentum turned bullish after the failed breakdown.
🚀 Upside Expansion: Price advanced toward the ₹2,440.00 area.
🏆 Trade Outcome: 0.91% upside with 1:7.6 RR.
🎯 The ₹2,417.90 VRZ Low, with the ₹2,415.10 swing low just below it, gave a very tight and clearly defined risk reference for the bullish BOF setup.
⚖️ A small, defined risk against a much larger upside move produced the 1:7.6 Risk-to-Reward outcome.
🧠 Structured position sizing, predefined invalidation levels, and disciplined execution matter when trading Breakout Failure setups.

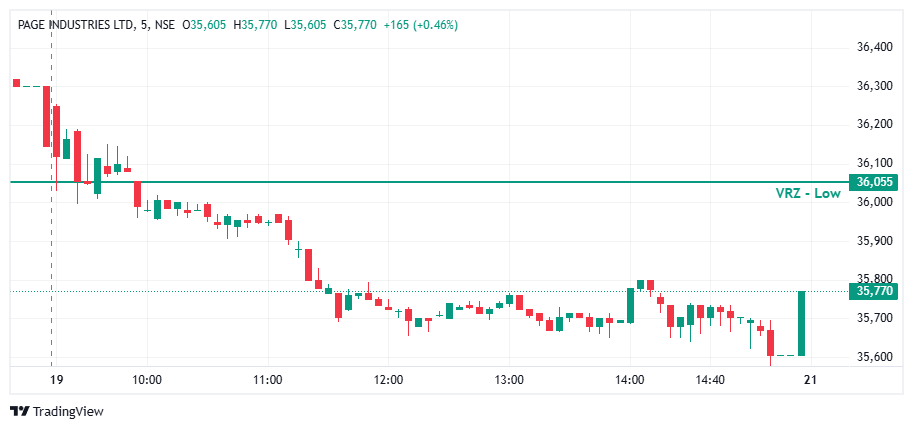

📉 PAGEIND established a bearish intraday structure shortly after the session began, with successive downward moves pushing price away from the ₹36,055 VRZ Low. 🚫 Buyers failed to reclaim the key reference level during the visible session, while price consolidated at lower levels instead of developing a sustained bullish reversal. 🔻 The final visible price near ₹35,770 remained below the VRZ Low, reinforcing the prevailing bearish structure and confirming the lack of bullish reclaim strength.
🎯 The bullish BOF setup required a clear reclaim and sustained acceptance above ₹36,055. However, PAGEIND remained below this level while the intraday structure continued to weaken. ⚠️ Entering before confirmation could expose the trade to further downside. Waiting for a valid reclaim, sustained acceptance, and bullish follow-through would provide stronger technical confirmation.
🔐 Define the stop-loss and invalidation conditions before entering a BOF trade. 📊 Monitor whether price follows the expected direction after the trigger instead of relying on the possibility of a later reversal. ⚠️ When price action contradicts the original setup, follow predefined risk rules and avoid holding an unconfirmed trade based on hope.
📌 The PAGEIND chart highlights the importance of waiting for confirmation rather than anticipating a reversal. Price remained below the ₹36,055 VRZ Low and continued to display bearish pressure. A valid BOF setup requires the expected price behaviour to develop; without it, the trade thesis should not be treated as confirmed.
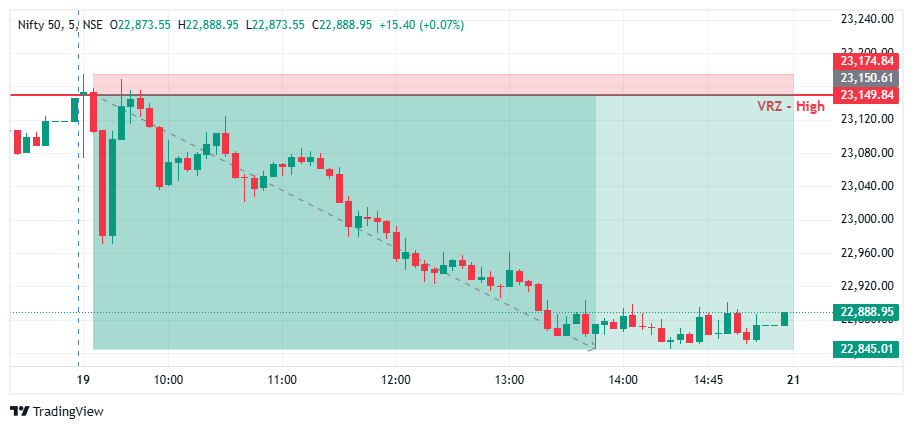

📊 Nifty 50 opened with bullish momentum and pushed directly toward the important ₹23,149.84 VRZ High resistance zone.
⚠️ Price action near this level showed an attempt to sustain higher prices and extend the upward move.
🎯 The VRZ High became a critical technical reference for identifying a potential bearish reversal.
🚨 Price tested the ₹23,149.84 VRZ High, briefly pushing into the resistance area near ₹23,174.84.
🪤 However, buyers failed to maintain acceptance above the marked zone, indicating weakening bullish momentum.
🔻 Selling pressure emerged near the resistance, creating the initial signs of a failed breakout.
🎯 The rejection from the VRZ High developed into a clear Bearish Breakout Failure (BOF) structure.
⚡ As price moved back below the resistance zone, sellers began regaining control of the short-term market structure.
📉 The failed breakout signaled a shift in momentum from buyers to sellers.
🔻 Following the VRZ High rejection, Nifty 50 trended steadily lower through the trading session.
📊 A sequence of lower highs and lower lows formed as bearish momentum expanded across the 5-minute chart.
💥 The strong downside movement eventually reached the ₹22,845 price area, confirming the successful bearish BOF setup.
📉 The reversal generated an impressive 1.32% downside move from the VRZ High rejection area.
⚡ The sharp, trend-driven expansion highlighted the strength of the failed breakout and subsequent bearish momentum.
🏆 With disciplined risk management, the trade achieved an exceptional 1:12.6 Risk-to-Reward ratio.
🔎 The key technical development in this setup was the inability of buyers to sustain price above the ₹23,149.84 VRZ High.
⚡ The rejection indicated that bullish momentum weakened near resistance, allowing sellers to take control.
📉 Once price moved back below the VRZ High, bearish momentum accelerated and created a significant downside expansion.
🔄 This combination of resistance rejection, failed breakout, and sustained selling pressure formed a textbook bearish BOF structure.
📍 VRZ High: ₹23,149.84 served as the key resistance reference.
🔺 Breakout Test: Buyers pushed above the zone but failed to sustain the breakout.
🚨 Rejection: Strong selling pressure appeared around the VRZ High.
🔄 BOF Confirmation: Price slipped back below the resistance area, confirming the failure.
🐻 Momentum Shift: Sellers took control as bearish momentum strengthened.
🎯 Downside Target: Price moved toward the ₹22,845 target area.
🏆 Trade Result: 1.32% downside with 1:12.6 RR.
🎯 A clearly defined VRZ High provided a structured technical reference for the bearish BOF setup.
⚖️ The exceptional 1:12.6 Risk-to-Reward outcome demonstrates the importance of identifying setups where potential reward substantially exceeds defined risk.
🧠 Proper position sizing, predefined risk levels, and disciplined execution remain essential for consistent trading.
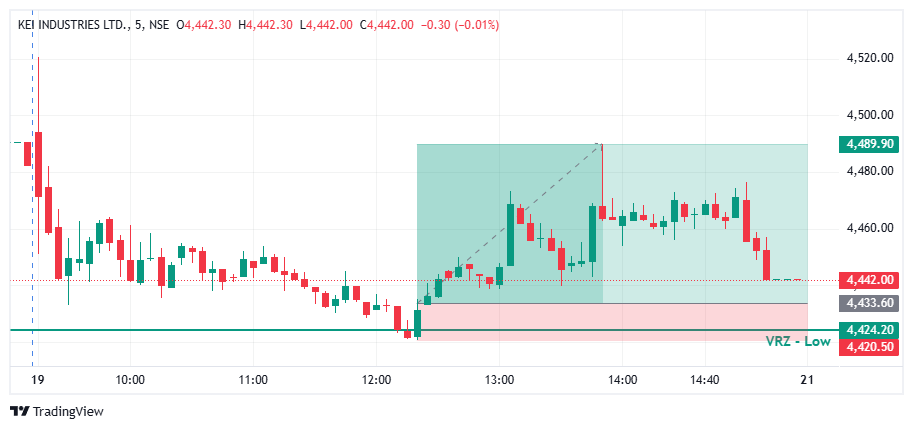

🔎 KEI INDUSTRIES experienced selling pressure during the first part of the session, with price gradually moving toward the ₹4,424.20 VRZ Low.
⚠️ The decline brought price close to the marked support zone, creating the possibility of a breakdown below the established level.
🎯 The VRZ Low became the key technical reference for evaluating a potential bullish reversal.
📉 Price tested the lower support region around the VRZ Low as sellers attempted to extend the decline.
🪤 The downside move failed to develop into sustained bearish continuation, and price began recovering from the lower zone.
🟢 Buyers stepped in around support, helping price move back above the marked level and establishing the basis for a potential bullish BOF setup.
🎯 The recovery from the VRZ Low formed a potential Bullish Breakout Failure (BOF) structure.
⚡ Price moved upward from the support region, indicating an improvement in short-term buying pressure.
📈 The subsequent recovery toward higher levels suggested a shift in intraday momentum from selling pressure to bullish price action.
📈 Following the VRZ Low reaction, KEI INDUSTRIES advanced toward the upper portion of the marked trading range.
⚡ Price experienced further upward movement, reaching the ₹4,489.90 area shown on the chart.
🔄 Although price pulled back from the intraday high, the recovery from the VRZ Low remained the central feature of the setup.
🏆 The reported trade outcome was a 1.27% price move with 1:4 RR.
🔍 The chart illustrates a decline toward support, followed by a recovery and upward price expansion.
🛡️ Support Reaction: Price responded around the ₹4,424.20 VRZ Low.
🔄 Structure Shift: The recovery indicated improving short-term bullish momentum.
📈 Upward Expansion: Price advanced toward the upper marked area near ₹4,489.90.
🎯 Technical Reference: The VRZ Low provided the key level for evaluating the bullish BOF structure.
🔎 The key feature of this setup was the recovery from the ₹4,424.20 VRZ Low after the downside test.
⚠️ A brief move below support does not independently confirm a bullish BOF; the reclaim and follow-through are important confirmation factors.
🟢 The recovery indicated that selling pressure was easing and buyers were regaining short-term control.
📈 The subsequent price expansion aligned with the reported bullish BOF outcome.
🟢 VRZ Low: ₹4,424.20 served as the primary support reference.
📉 Support Test: Price approached the lower zone after an extended decline.
🛡️ Buyer Response: Price recovered from the support region.
🔄 Bullish Reclaim: Price moved back above the key VRZ level.
⚡ Momentum Shift: Buying pressure strengthened during the recovery.
🚀 Price Expansion: Price advanced toward the ₹4,489.90 area.
🏆 Reported Outcome: 1.27% move with 1:4 RR.
🎯 The VRZ Low provided a key technical reference for assessing the potential bullish setup.
⚖️ A 1:4 risk-to-reward ratio represents a potential reward of four units for every unit of defined risk.
🧠 Predefined stop-loss levels, appropriate position sizing, and disciplined execution remain essential when trading Breakout Failure patterns.

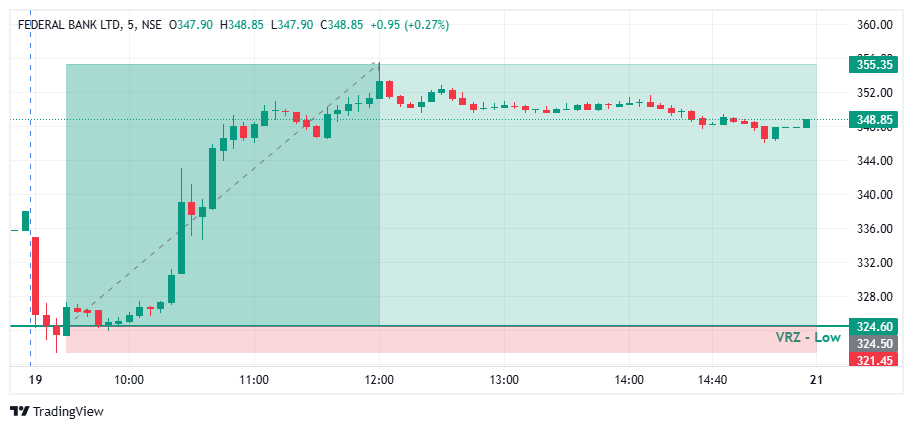

🔎 FEDERALBNK opened under heavy pressure and fell sharply in the first few candles.
⚠️ Price dropped straight into the ₹324.60 VRZ Low, where a breakdown looked likely.
🎯 The VRZ Low became the key technical reference for spotting a potential bullish Breakout Failure.
📉 Price dipped below the ₹324.60 VRZ Low and touched the ₹321.45 area, showing a clear attempt by sellers to extend the downside.
🪤 The move below support was shallow and could not hold.
🔄 Buyers stepped in right at the lows, forming the first base for a bullish reversal.
🎯 Price closed back above the ₹324.60 VRZ Low, confirming a Bullish Breakout Failure structure.
⚡ The failed breakdown showed that sellers had lost control below support.
📈 Once the level was reclaimed, short-term momentum shifted decisively toward the buyers.
📈 After a brief base above support, FEDERALBNK surged with a strong run of green candles and higher lows.
⚡ Buyers pushed price out of the breakdown zone and into a powerful bullish expansion.
💥 The rally peaked near ₹355.35, a 9.5% price expansion that confirmed the successful BOF outcome.
🔍 The chart shows a sharp opening sell-off, a brief break of the ₹324.60 VRZ Low, a tight base above support, and a strong recovery toward the highs.
🟢 The reclaim of the zone was the key confirmation for the bullish BOF structure.
📈 After peaking around noon, price settled into a steady range well above the VRZ Low for the rest of the session.
🎯 The shift from breakdown pressure to bullish expansion was the defining technical event of this setup.
🔎 The main signal was the failed breakdown below the ₹324.60 VRZ Low.
⚡ Sellers pushed price under support, but the move lacked sustained follow-through.
🟢 The reclaim of the VRZ Low signalled a change in short-term price structure.
📈 Buyers then drove the recovery to much higher levels, producing the reported 9.5% move.
🟢 VRZ Low: ₹324.60 served as the primary support reference.
⚠️ Breakdown Failure: Sellers could not hold price below the support zone.
🛡️ Buyer Defense: Buyers responded strongly near the ₹321.45 low.
🔄 Bullish Reclaim: Price recovered back above the key level.
📊 Momentum Shift: Short-term momentum turned bullish after the failed breakdown.
🚀 Upside Expansion: Price advanced toward the ₹355.35 area.
🏆 Trade Outcome: 9.5% upside with 1:10 RR.
🎯 The ₹324.60 VRZ Low, with the ₹321.45 swing low just below it, gave a very tight and clearly defined risk reference for the bullish BOF setup.
⚖️ A small, defined risk against a much larger upside move produced the 1:10 Risk-to-Reward outcome.
🧠 Structured position sizing, predefined invalidation levels, and disciplined execution matter when trading Breakout Failure setups.