Select a trading day to view all Scanner results, chart evidence, and market explanations.
5 Scanners Available
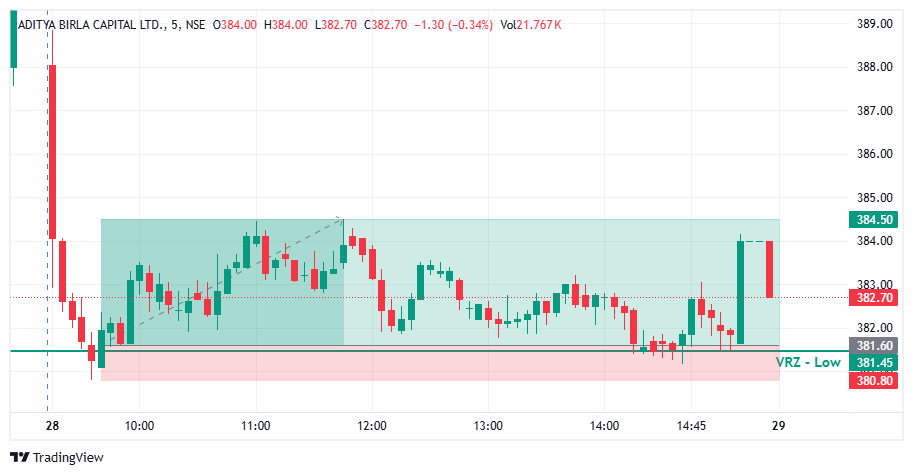

🔎 ABCAPITAL traded within an intraday range before gradually moving toward the ₹381.45 VRZ Low.
⚠️ Selling pressure increased as price approached this important support reference.
🎯 The VRZ Low became the key technical level for identifying a potential failed breakdown and bullish reversal.
📉 Price tested the ₹381.45 VRZ Low, with sellers attempting to push the stock below the marked support.
🪤 The breakdown failed to sustain, as bearish momentum weakened around the lower zone.
🔄 Buyers stepped in near the VRZ Low, creating the foundation for a bullish BOF structure.
🎯 The recovery from the VRZ Low developed into a Bullish Breakout Failure setup.
⚡ Price reclaimed the key support area as buyers regained short-term control.
📈 This failed breakdown shifted the price structure from bearish pressure toward bullish recovery.
📈 Following the VRZ Low rejection, ABCAPITAL moved higher from the support region.
⚡ Buyers pushed price away from the breakdown area, strengthening the bullish momentum.
💥 The move extended toward the ₹384.50 area, producing the reported 0.76% price move.
🔍 Multiple interactions around the VRZ Low highlighted the importance of the ₹381.45 support zone.
🟢 The successful reclaim of this level provided confirmation for the bullish BOF structure.
📈 Price subsequently expanded toward higher levels, showing a clear recovery from the support region.
🎯 The transition from breakdown pressure to bullish price action was the key technical development.
🔎 The central technical signal was the failed breakdown around the ₹381.45 VRZ Low.
⚠️ Sellers attempted to extend the downside, but the move failed to sustain below the support zone.
🔄 The subsequent reclaim of the VRZ Low indicated a shift in short-term price structure.
📈 Buyers then drove the recovery toward higher levels, resulting in the reported 0.76% move.
🟢 VRZ Low: ₹381.45 served as the key support reference.
⚠️ Breakdown Failure: Sellers failed to maintain pressure below the lower zone.
🛡️ Buyer Defense: Buyers responded around the VRZ Low.
🔄 Support Reclaim: Price recovered above the marked level.
📊 Momentum Shift: Bullish price action developed after the failed breakdown.
🚀 Upside Expansion: Price moved toward the ₹384.50 area.
🏆 Trade Outcome: 0.76% upside with 1:3 RR.
🎯 The ₹381.45 VRZ Low provided a defined technical reference for the bullish BOF setup.
⚖️ The reported 1:3 Risk-to-Reward reflects the planned relationship between risk and potential reward.
🧠 Structured position sizing, predefined invalidation levels, and disciplined execution remain important when trading Breakout Failure setups.

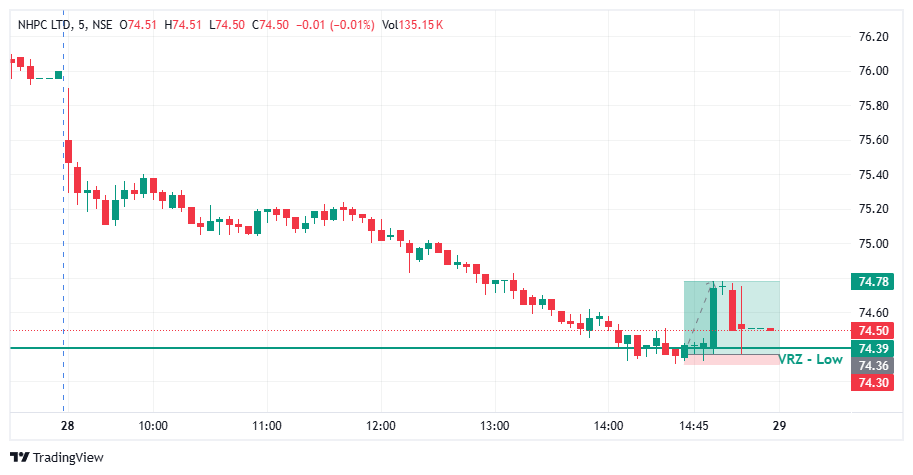

🔻 NHPC tested the VRZ Low, where sellers attempted to extend the downside below the support zone.
🚨 The breakdown failed to sustain as price rejected lower levels around ₹74.39.
🟢 The recovery above the VRZ Low confirmed the Breakdown Failure (BOF) structure and created a bullish reversal setup.
🟢 Buyers stepped in after the failed breakdown and pushed NHPC back above the key support area.
📊 The recovery from the ₹74.39 VRZ Low showed improving buying participation.
🚀 The setup ultimately delivered a 0.56% bullish move with a strong 1:7 Risk-Reward.
🔴 Sellers: Attempted to sustain the breakdown below the VRZ Low.
🟡 Breakdown Traders: Came under pressure as price reclaimed the support zone.
🟢 Buyers: Regained control and initiated the bullish recovery.
🎭 The initial downside move created bearish expectations around the support zone.
⚠️ However, sellers failed to sustain price below the VRZ Low.
📈 The rejection shifted short-term momentum toward buyers and supported the bullish reversal.
🎯 The key confirmation came when NHPC rejected the ₹74.39 VRZ Low and recovered above the zone.
🔄 The failed breakdown indicated weakening selling pressure.
⚡ Continued upside price action provided follow-through for the bullish BOF structure.
🔸 🚫 Failed Breakdowns Can Trap Sellers
When price fails to sustain below support, breakdown positions can come under pressure.
🔹 🎯 VRZ Low Rejection
The ₹74.39 zone provided an important technical reference for identifying the reversal.
🛡️ Defined Risk Supports Trade Discipline
The VRZ Low offered a clear level for monitoring and managing trade risk.
⚡ 📈 Bullish Follow-Through
The recovery after the rejection helped establish short-term upside momentum.
📈 Following the VRZ Low rejection, NHPC developed a short-term bullish recovery structure.
🟢 Buyers regained control as price moved away from the support zone.
🚀 The improving price action supported the continuation of the bullish move.
🔥 Buying momentum strengthened after the breakdown failure.
📈 NHPC recovered from the VRZ Low and extended the upside move.
🏆 The setup delivered a 0.56% bullish move with 1:7 RR.
🔸 The setup became actionable after NHPC failed to sustain below the ₹74.39 VRZ Low.
📈 Buyers reclaimed the support zone and established bullish control.
⚖️ The confirmed BOF structure provided a defined-risk intraday setup with a 1:7 Risk-Reward opportunity.
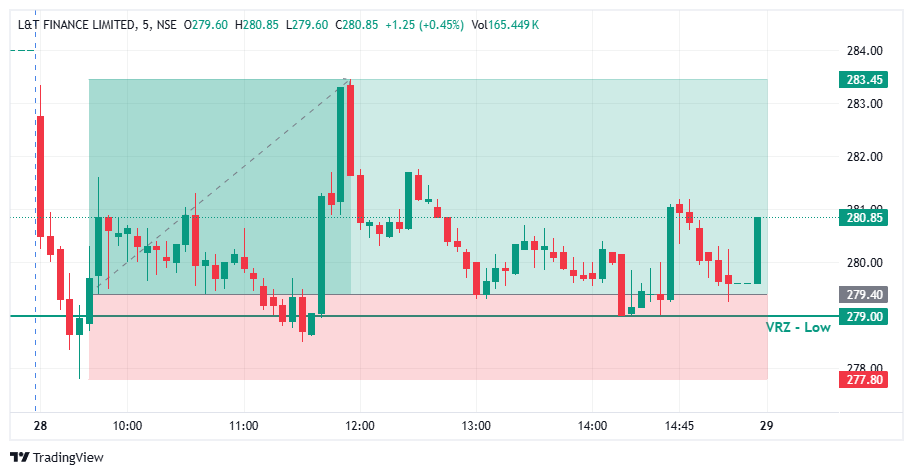

🔎 L&TFINANCE traded within an intraday range before moving toward the ₹279.00 VRZ Low.
⚠️ Repeated tests around the support zone indicated increasing selling pressure and the possibility of a breakdown.
🎯 The VRZ Low became the key technical reference for identifying a potential bullish Breakout Failure.
📉 Price moved around and briefly below the ₹279.00 VRZ Low, showing an attempt by sellers to extend the downside.
🪤 However, bearish momentum failed to sustain below the marked support area.
🔄 Buyers stepped in near the VRZ Low, creating the initial structure for a bullish reversal.
🎯 The recovery above the ₹279.00 VRZ Low developed into a Bullish Breakout Failure structure.
⚡ The failed breakdown indicated that sellers could not maintain control below the support zone.
📈 As price reclaimed the key level, short-term momentum shifted toward the buyers.
📈 Following the VRZ Low rejection, L&TFINANCE moved higher from the support area.
⚡ Buyers pushed price away from the breakdown zone, creating a broader bullish recovery.
💥 The move eventually produced a 1.45% price expansion, confirming the successful BOF outcome.
🔍 The chart shows multiple interactions around the ₹279.00 VRZ Low, followed by a recovery toward higher levels.
🟢 The reclaim of the support zone became an important confirmation for the bullish BOF structure.
📈 Price subsequently moved toward the ₹283.45 area, reflecting the upside expansion after the failed breakdown.
🎯 The transition from breakdown pressure to bullish recovery was the key technical development in this setup.
🔎 The major technical signal was the failed breakdown below the ₹279.00 VRZ Low.
⚡ Sellers attempted to push price below support, but the move lacked sustained follow-through.
🟢 The subsequent reclaim of the VRZ Low indicated a shift in short-term price structure.
📈 Buyers then drove the recovery toward higher levels, resulting in the reported 1.45% move.
🟢 VRZ Low: ₹279.00 served as the primary support reference.
⚠️ Breakdown Failure: Sellers failed to sustain pressure below the support zone.
🛡️ Buyer Defense: Buyers responded around the VRZ Low.
🔄 Bullish Reclaim: Price recovered back above the key level.
📊 Momentum Shift: Short-term momentum turned bullish after the failed breakdown.
🚀 Upside Expansion: Price advanced toward the ₹283.45 area.
🏆 Trade Outcome: 1.45% upside with 1:2 RR.
🎯 The ₹279.00 VRZ Low provided a defined technical reference for the bullish BOF setup.
⚖️ The 1:2 Risk-to-Reward outcome reflects the reported relationship between planned risk and potential reward.
🧠 Structured position sizing, predefined invalidation levels, and disciplined execution are important when trading Breakout Failure setups.
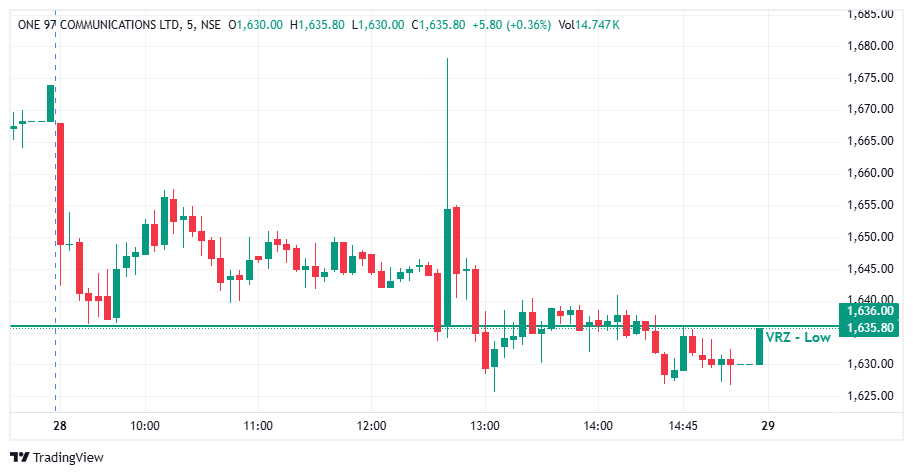

📉 PAYTM traded around and eventually broke below the ₹1,635.80 VRZ Low, creating a potential bullish BOF opportunity. ⚠️ Although buyers attempted to recover the broken level, the move lacked sustained strength. 🔻 Price later slipped back below the VRZ Low, keeping the overall intraday structure weak.
🔎 The session initially showed volatility around the key zone, followed by a sharp breakdown below ₹1,635.80. 🔄 Buyers then produced a strong recovery toward the ₹1,650–₹1,655 area, but 📉 the recovery could not develop into sustained bullish continuation. ⚠️ Subsequent lower levels indicated that sellers were still active.
🎯 The bullish BOF required a decisive reclaim of ₹1,635.80 followed by sustained acceptance above the zone. 🟢 Price did recover strongly after the breakdown, but 🚫 the broader move failed to establish a stable bullish structure. 🔴 After the recovery was rejected, price returned toward the VRZ Low and remained vulnerable to further selling.
⚡ The sharp recovery around midday created temporary bullish momentum, with price moving toward ₹1,655. 🟢 However, the upside move was followed by strong rejection candles and renewed selling. 🔻 Price gradually weakened toward the ₹1,630 area before making another late recovery attempt, showing that bullish momentum could not remain consistent.
🎯 The bullish BOF required a sustained reclaim and acceptance above ₹1,635.80. 🚫 Although buyers produced a sharp recovery, the move did not maintain consistent bullish follow-through. ⚠️ Entering without confirmation would have exposed the position to renewed selling pressure. 🧭 Waiting for reclaim + acceptance + bullish continuation would have provided stronger setup validation.
🔒 The PAYTM setup highlights why a sharp recovery should not automatically be treated as a confirmed reversal. ⚠️ When price loses momentum after reclaiming a key VRZ level, the bullish thesis needs to be reassessed. 🛑 Using ₹1,635.80 as a key validation and risk-reference level helps maintain discipline when the reversal fails to hold.
🧩 The strong midday recovery could create the impression that the bullish BOF had succeeded. 👀 However, traders still needed to monitor whether buyers could maintain acceptance above the VRZ Low. ⚠️ The subsequent rejection showed that the recovery lacked consistent follow-through. 🎯 The lesson is to confirm sustained acceptance rather than chase the first recovery move.
📍 ₹1,635.80 was the primary decision zone for the PAYTM setup. 🔄 Buyers attempted to recover strongly after the breakdown, but the reversal lacked sustained acceptance and later faced renewed selling pressure. 📊 This case study reinforces the importance of waiting for a confirmed VRZ reclaim before treating a breakdown as a valid bullish BOF.
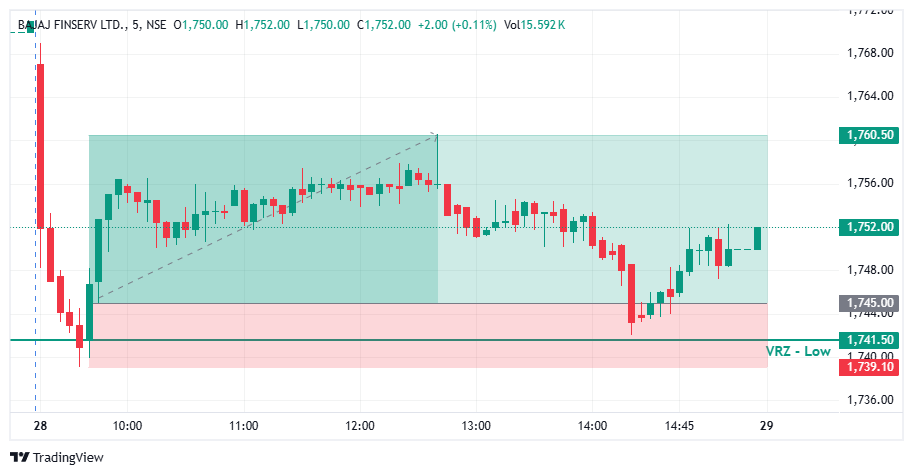

🔻 BAJAJFINSV tested the VRZ Low, where sellers attempted to extend the downside below the support zone.
🚨 The breakdown failed to sustain as price rejected the lower levels around ₹1,741.50.
🟢 The recovery above the VRZ Low confirmed the Breakdown Failure (BOF) structure and created a bullish reversal setup.
🟢 Buyers stepped in after the failed breakdown and pushed price back above the key support area.
📊 The recovery from ₹1,741.50 indicated improving buying participation.
🚀 The setup ultimately delivered a 0.89% bullish move with a 1:2 Risk-Reward.
🔴 Sellers: Attempted to sustain the breakdown below the VRZ Low.
🟡 Breakdown Traders: Came under pressure as price reclaimed the support zone.
🟢 Buyers: Regained control and initiated the bullish recovery.
🎭 The initial breakdown attempt created bearish expectations.
⚠️ However, sellers failed to maintain price below the VRZ Low.
📈 The rejection shifted momentum toward buyers and supported the upside reversal.
🎯 The key confirmation came when BAJAJFINSV rejected the ₹1,741.50 VRZ Low and recovered above the zone.
🔄 The failed breakdown signaled weakening selling pressure.
⚡ Continued bullish price action provided follow-through for the BOF setup.
🔸 🚫 Failed Breakdowns Can Trap Sellers
When price fails to sustain below support, breakdown positions can come under pressure.
🔹 🎯 VRZ Low Rejection
The ₹1,741.50 zone provided an important technical reference for the reversal.
🛡️ Defined Risk Supports Trade Discipline
The VRZ Low offered a clear level for managing downside risk.
⚡ 📈 Bullish Follow-Through
The recovery after the rejection helped establish positive short-term momentum.
📈 Following the VRZ Low rejection, BAJAJFINSV developed a stronger intraday recovery structure.
🟢 Buyers gradually regained control as price moved away from the support zone.
🚀 The improving structure supported the continuation of the bullish move.
🔥 Buying momentum strengthened after the breakdown failure.
📈 BAJAJFINSV recovered from the VRZ Low and extended the upside move.
🏆 The setup delivered a 0.89% bullish move with 1:2 RR.
🔸 The setup became actionable after BAJAJFINSV failed to sustain below the ₹1,741.50 VRZ Low.
📈 Buyers reclaimed the support zone and established bullish control.
⚖️ The confirmed BOF structure provided a defined-risk intraday setup with a 1:2 Risk-Reward opportunity.
