Select a trading day to view all Scanner results, chart evidence, and market explanations.
5 Scanners Available
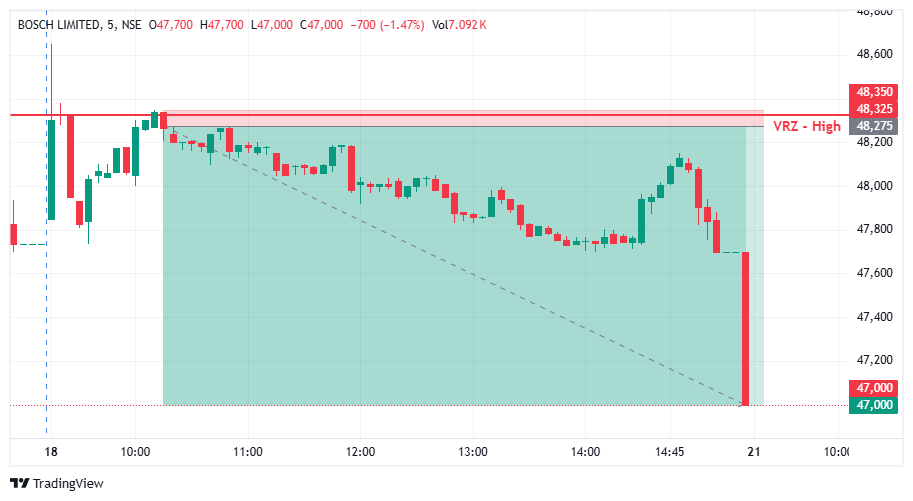

📊 BOSCHLTD traded with bullish momentum before approaching the important ₹48,275 VRZ High resistance zone.
⚠️ Price action near this level showed an attempt to sustain higher prices and continue the upward movement.
🎯 The VRZ High became a critical technical reference for identifying a potential bearish reversal.
🚨 Price tested the ₹48,275 VRZ High, briefly moving into the resistance area.
🪤 However, buyers failed to maintain acceptance above the marked zone, indicating weakening bullish momentum.
🔻 Selling pressure emerged near the resistance, creating the initial signs of a failed breakout.
🎯 The rejection from the VRZ High developed into a clear Bearish Breakout Failure (BOF) structure.
⚡ As price moved back below the resistance zone, sellers began regaining control of the short-term market structure.
📉 The failed breakout signaled a shift in momentum from buyers to sellers.
🔻 Following the VRZ High rejection, BOSCHLTD continued moving lower throughout the trading session.
📊 Lower price levels formed as bearish momentum gradually expanded across the chart.
💥 The strong downside movement eventually reached the ₹47,000 price area, confirming the successful bearish BOF setup.
📉 The reversal generated an impressive 2.64% downside move from the VRZ High rejection area.
⚡ The sharp price expansion highlighted the strength of the failed breakout and subsequent bearish momentum.
🏆 With disciplined risk management, the trade achieved an exceptional 1:17 Risk-to-Reward ratio.
🔎 The key technical development in this setup was the inability of buyers to sustain price above the ₹48,275 VRZ High.
⚡ The rejection indicated that bullish momentum weakened near resistance, allowing sellers to take control.
📉 Once price moved back below the VRZ High, bearish momentum accelerated and created a significant downside expansion.
🔄 This combination of resistance rejection, failed breakout, and strong selling pressure formed a textbook bearish BOF structure.
📍 VRZ High: ₹48,275 served as the key resistance reference.
🔺 Breakout Test: Buyers pushed above the zone but failed to sustain the breakout.
🚨 Rejection: Strong selling pressure appeared around the VRZ High.
🔄 BOF Confirmation: Price slipped back below the resistance area, confirming the failure.
🐻 Momentum Shift: Sellers took control as bearish momentum strengthened.
🎯 Downside Target: Price moved toward the ₹47,000 target area.
🏆 Trade Result: 2.64% downside with 1:17 RR.
🎯 A clearly defined VRZ High provided a structured technical reference for the bearish BOF setup.
⚖️ The exceptional 1:17 Risk-to-Reward outcome demonstrates the importance of identifying setups where potential reward substantially exceeds defined risk.
🧠 Proper position sizing, predefined risk levels, and disciplined execution remain essential for consistent trading.

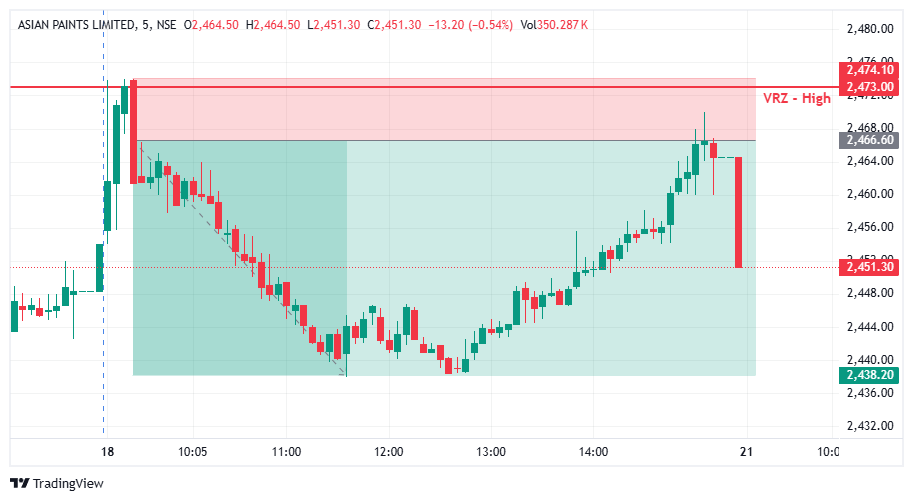

🟢 ASIANPAINT moved toward the VRZ High, where buyers attempted to push the price above the resistance zone.
⚠️ The breakout failed to sustain as price faced rejection near the ₹2,473.00 VRZ High.
🔴 This rejection confirmed the Breakout Failure (BOF) setup and created a bearish intraday opportunity.
🔴 Sellers stepped in after the failed breakout and pushed ASIANPAINT lower from the VRZ High.
📊 The rejection near ₹2,473.00 indicated weakening buying pressure and increasing selling participation.
💥 The setup ultimately delivered a 1.15% bearish move with a 1:4 Risk-Reward.
🟢 Buyers: Attempted to sustain the breakout above the VRZ High.
🟡 Breakout Traders: Came under pressure as the breakout failed to continue.
🔴 Sellers: Regained control and drove the price lower.
🎭 The initial move toward the VRZ High created bullish expectations.
⚠️ However, the inability to sustain above resistance weakened the breakout momentum.
📉 The rejection shifted momentum toward sellers and supported the downside reversal.
🎯 The key confirmation came when ASIANPAINT failed to sustain above the ₹2,473.00 VRZ High.
🔄 The failed breakout showed that bullish momentum was losing strength.
⚡ Continued downside movement provided follow-through for the bearish BOF setup.
🔸 🚫 Failed Breakouts Can Trap Buyers
When price fails to sustain above resistance, breakout positions can come under pressure.
🔹 🎯 VRZ High Rejection Matters
The rejection near the VRZ High highlighted renewed selling participation.
🛡️ Defined Risk Supports Trade Discipline
The VRZ High provided a clear reference point for managing trade risk.
⚡ 📉 Follow-Through Strengthens the Setup
Continued downside movement after the rejection supported the bearish reversal structure.
📉 Following the failed breakout, ASIANPAINT developed a bearish intraday structure.
🔴 Sellers gradually took control as price moved lower from the VRZ High.
📌 The developing downside structure supported the continuation of bearish momentum.
🔥 Selling pressure strengthened following the breakout failure.
📉 ASIANPAINT continued moving lower from the VRZ High and extended the bearish reversal.
🏆 The trade delivered a 1.15% downside move with a 1:4 RR.
🔸 The setup became actionable after ASIANPAINT failed to sustain above the ₹2,473.00 VRZ High.
📉 Sellers regained control and pushed the price lower.
⚖️ The confirmed BOF structure provided a disciplined intraday setup with defined risk and a 1:4 Risk-Reward opportunity.
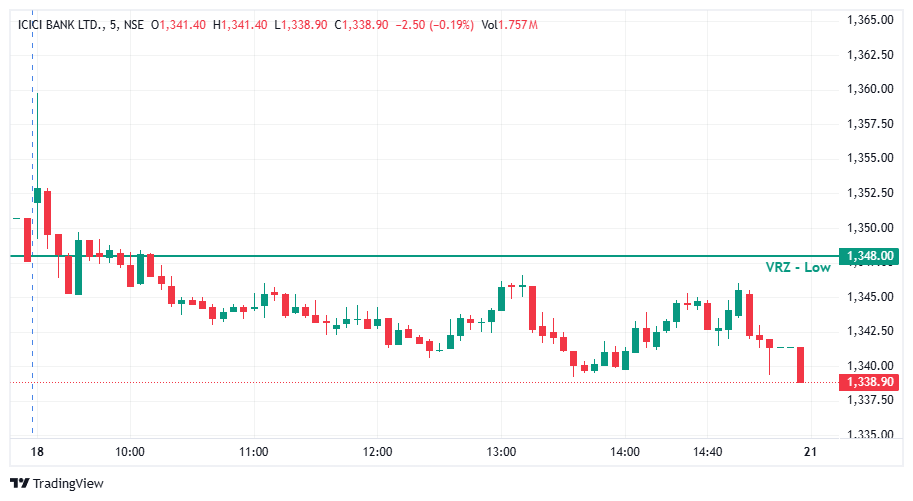

📉 ICICIBANK broke below the ₹1,348.00 VRZ Low during the opening phase, creating a potential bullish BOF setup. ⚠️ However, the expected recovery failed to develop with sufficient strength. 🔻 Price continued to trade below the key zone, while sellers gradually pushed the stock toward lower levels.
📊 After the breakdown, ICICIBANK remained below ₹1,348.00 and developed a weak intraday structure. 🔻 Recovery attempts produced only limited upside movement, with price repeatedly failing to challenge the VRZ Low convincingly. 🧱 The broken level continued to act as resistance instead of turning into support.
🎯 The bullish BOF required a decisive reclaim and sustained acceptance above ₹1,348.00. 🚫 Price never established a convincing reclaim of the VRZ Low. ⚠️ Buyers made several recovery attempts during the session, but each move lost momentum below the key level. 🔴 As a result, the expected bullish reversal remained invalid.
🔎 Price action below the VRZ Low showed limited bullish follow-through. 🟢 Although intermittent green candles appeared during the recovery phases, they failed to produce a sustained breakout above ₹1,348.00. 📉 The later-session selling pressure increased, with price eventually moving toward ₹1,338.90, showing continued bearish momentum.
🎯 The bullish BOF required a decisive reclaim of ₹1,348.00 before confirmation. 🚫 Since price failed to regain and sustain above the level, the setup remained unconfirmed. ⚠️ Entering before confirmation would have increased downside exposure as the bearish structure remained intact. 🧭 Waiting for reclaim + acceptance + bullish follow-through would have provided stronger trade validation.
🔒 When a VRZ Low continues to act as resistance, the bullish reversal thesis should be reassessed. ⚠️ Avoiding premature entries can reduce exposure when the expected BOF fails to develop. 🛑 Respecting the setup's invalidation condition helps maintain disciplined risk control during weak price action.
🧩 A breakdown alone does not guarantee a successful bullish BOF. 👀 Traders should wait for genuine buyer participation and confirmation after the breakdown. ⚠️ Repeated failed recovery attempts can indicate that bullish conviction is weakening. 🎯 Rejection + reclaim + acceptance should confirm the reversal rather than assuming that price will automatically recover from the VRZ Low.
📍 The ₹1,348.00 VRZ Low was the critical decision level in this ICICIBANK setup. 🔻 Price remained below the zone and failed to establish a sustained reclaim. 📊 The continued weakness demonstrates why confirmation is essential before treating a breakdown as a bullish BOF opportunity.
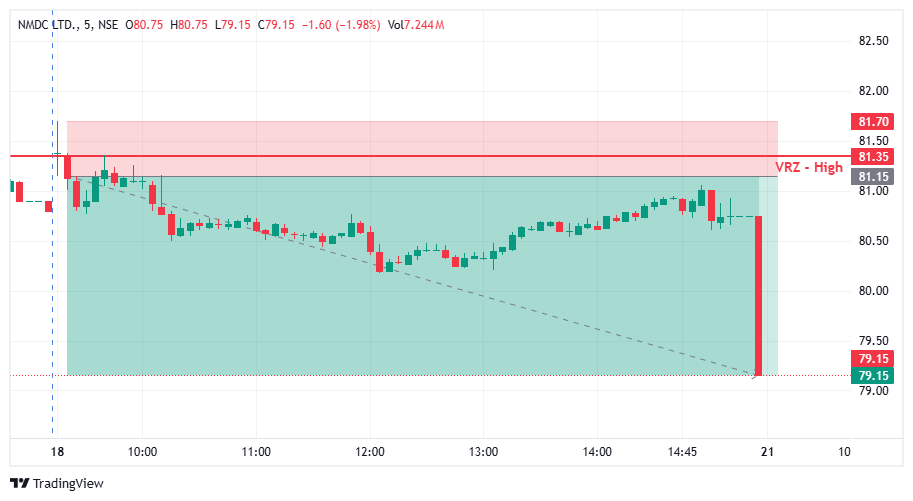

📊 NMDC traded within a defined intraday range before approaching the important ₹81.35 VRZ High resistance zone.
⚠️ Price action near this level showed an attempt by buyers to sustain higher prices and continue the upward movement.
🎯 The VRZ High became a critical reference level for identifying a potential bearish breakout failure.
🚨 Price tested the ₹81.35 VRZ High, but buyers failed to sustain the breakout above resistance.
🪤 The inability to maintain higher levels indicated weakening bullish momentum near the marked zone.
🔻 Selling pressure emerged as price struggled to hold above the resistance area.
🎯 The rejection from the VRZ High developed into a clear Bearish Breakout Failure (BOF) structure.
⚡ Once price moved back below the resistance zone, sellers began gaining control of the short-term price action.
📉 The failed breakout created a shift in market structure, opening the possibility of a stronger downside move.
🔻 Following the VRZ High rejection, NMDC continued to trade with increasing bearish pressure.
📊 Price gradually moved lower through the session as sellers maintained control.
💥 The downside momentum accelerated toward the end of the trading session, confirming the bearish BOF setup.
📉 NMDC eventually reached the ₹79.15 price area, delivering a significant 2.46% downside move.
⚡ The sharp bearish expansion demonstrated the effectiveness of the failed breakout and resistance rejection.
🏆 With disciplined risk management, the setup achieved an impressive 1:3 Risk-to-Reward ratio.
🔎 The key technical development in this setup was the failure to sustain price above the ₹81.35 VRZ High.
⚡ Buyers attempted to push through resistance, but the breakout lacked follow-through and resulted in rejection.
📉 The subsequent move below the VRZ High confirmed a shift in short-term momentum toward sellers.
🔻 This combination of resistance failure, bearish price action, and strong downside expansion created the successful BOF opportunity.
🔹 VRZ High: ₹81.35 acted as the primary resistance reference.
🔹 Breakout Attempt: Buyers tested higher levels but failed to sustain acceptance.
🔹 Rejection: Selling pressure emerged near the VRZ High.
🔹 Bearish Confirmation: Price moved back below the resistance zone.
🔹 Momentum Shift: Sellers gained control of the short-term structure.
🔹 Downside Target Area: ₹79.15.
🔹 Trade Outcome: 2.46% downside with 1:3 RR.
🎯 A clearly defined VRZ High provided an important technical reference for managing the bearish setup.
⚖️ The 1:3 Risk-to-Reward outcome highlights the value of combining a structured entry with controlled risk and a predefined trade objective.
🧠 Proper position sizing and disciplined execution remain essential when trading Breakout Failure setups.
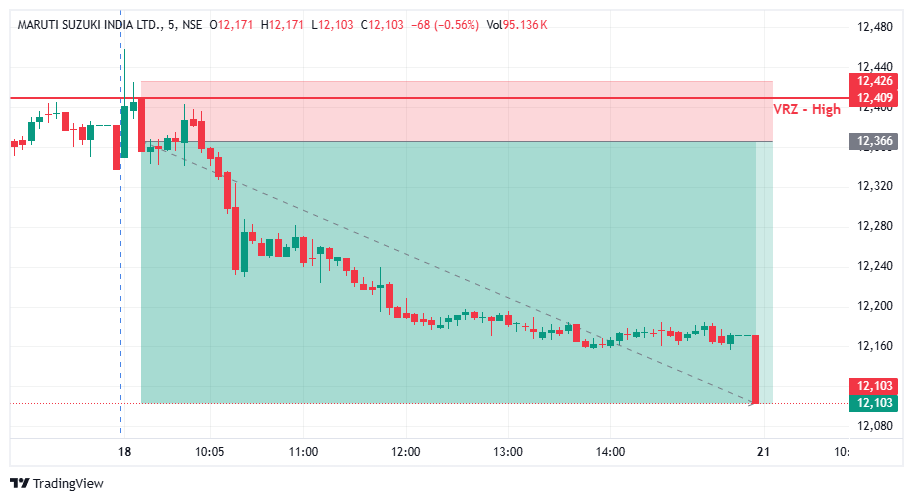

🟢 MARUTI moved toward the VRZ High, where buyers attempted to push the price above the resistance zone.
⚠️ The breakout failed to sustain as price faced rejection around the ₹12,409 VRZ High.
🔴 This rejection confirmed the Breakout Failure (BOF) setup and created a bearish intraday opportunity.
🔴 Sellers stepped in following the failed breakout and pushed MARUTI lower from the VRZ High.
📊 The rejection near ₹12,409 showed weakening buying pressure and increasing selling participation.
💥 The setup eventually delivered a strong 2.13% bearish move with a 1:4 Risk-Reward.
🟢 Buyers: Attempted to extend the breakout above the VRZ High.
🟡 Breakout Traders: Faced pressure as the breakout failed to sustain.
🔴 Sellers: Regained control and drove the price lower.
🎭 The initial move toward the VRZ High created bullish expectations.
⚠️ However, the inability to sustain above resistance weakened the breakout momentum.
📉 The rejection shifted market control toward sellers and supported the downside reversal.
🎯 The key confirmation came when MARUTI failed to sustain above the ₹12,409 VRZ High.
🔄 The failed breakout indicated that bullish momentum was losing strength.
⚡ Continued downside movement provided follow-through for the bearish BOF setup.
🔸 🚫 Failed Breakouts Can Trap Buyers
When price fails to sustain above resistance, breakout positions can come under pressure.
🔹 🎯 VRZ High Rejection Matters
The rejection around the VRZ High highlighted increasing selling participation.
🛡️ Defined Risk Supports Trade Discipline
The VRZ High provided a clear reference point for managing trade risk.
⚡ 📉 Follow-Through Strengthens the Setup
Continued downside movement after the rejection supported the bearish reversal structure.
📉 Following the failed breakout, MARUTI developed a clear bearish intraday structure.
🔴 Sellers maintained control as price moved progressively lower from the VRZ High.
📌 The developing downside structure supported the continuation of bearish momentum.
🔥 Selling pressure increased after the breakout failure.
📉 MARUTI continued moving lower from the VRZ High and extended the bearish reversal.
🏆 The trade ultimately delivered a 2.13% downside move with a 1:4 RR.
🔸 The setup became actionable after MARUTI failed to sustain above the ₹12,409 VRZ High.
📉 Sellers regained control and pushed the price lower.
⚖️ The confirmed BOF structure provided a disciplined intraday setup with defined risk and a 1:4 Risk-Reward opportunity.
