
Select a trading day to view all Scanner results, chart evidence, and market explanations.
6 Scanners Available
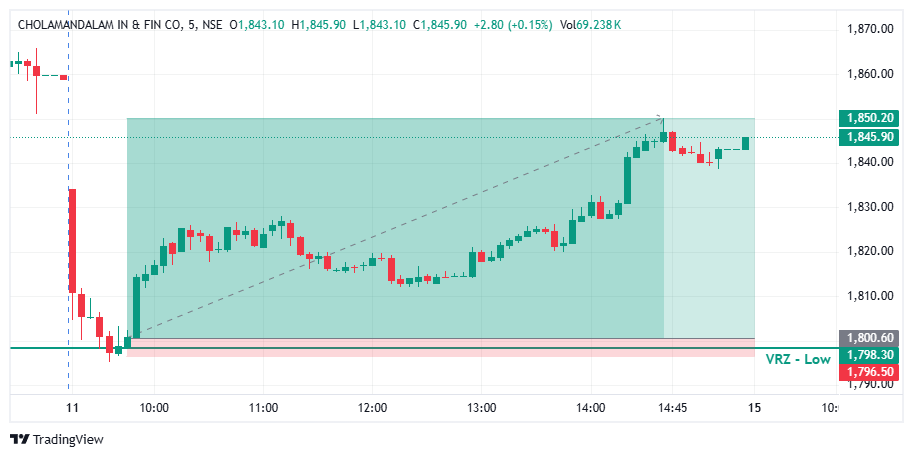

🔻 CHOLAFIN initially tested the VRZ Low, with sellers attempting to push price below the support zone.
⚠️ The breakdown failed to sustain as sellers were unable to maintain control below the VRZ Low.
🟢 Price reclaimed the zone, signaling that the breakdown was unsuccessful.
📈 This recovery confirmed the Breakout Failure (BOF) setup and created a bullish intraday opportunity.
🟢 Following the failed breakdown, buyers stepped in and regained control.
📈 Price started forming higher levels as bullish momentum developed.
🔺 The recovery from the VRZ Low transitioned into a sustained upward move.
🎯 The setup ultimately delivered a 2.75% bullish move with an impressive 1:12 Risk-Reward.
🔴 Sellers: Attempted to break the VRZ Low and extend the downside.
🟡 Breakdown Traders: Became trapped when price failed to sustain below the support zone.
🟢 Buyers: Used the failed breakdown as an opportunity to regain control.
🚀 This shift in market control helped fuel the bullish reversal.
🎭 The initial breakdown created bearish expectations among market participants.
🚨 When price failed to remain below the VRZ Low, bearish confidence weakened.
😵 Trapped sellers were forced to reconsider their positions as price moved back above the zone.
📈 Increasing buying pressure helped accelerate the bullish reversal.
🚫 Failed Breakdowns Can Reverse Sharply
A breakdown without sustained selling pressure can quickly turn into a bullish reversal.
🎯 Support Rejection Signals Buyer Strength
The rejection around ₹1,798.30 highlighted the inability of sellers to maintain downside control.
🛡️ Defined Zones Improve Risk Control
The VRZ Low provided a clear reference point for identifying the failed breakdown and managing trade risk.
⚡ Momentum Confirmation Matters
Once price reclaimed the zone and buyers gained control, bullish momentum expanded significantly.
📈 After the failed breakdown, CHOLAFIN developed a stronger bullish price structure.
🟢 Buyers progressively pushed price toward higher levels.
🔺 Higher highs and higher lows reflected improving buyer control.
🐂 The bullish structure remained intact and supported continued upside movement.
🚨 Buying pressure increased as CHOLAFIN moved further away from the VRZ Low.
📈 The failed breakdown transformed into sustained bullish momentum.
⚡ The recovery demonstrated strong follow-through after the BOF confirmation.
🎯 The move resulted in a 2.75% upside performance and an exceptional 1:12 RR outcome.
🔸 The trade developed after CHOLAFIN failed to sustain the breakdown below the VRZ Low.
🟢 Price reclaimed the support zone, indicating that sellers had lost control.
📈 Buyers then extended the recovery with strong bullish follow-through.
🏆 The setup produced a 2.75% bullish move with an impressive 1:12 Risk-Reward.

💡 The CHOLAFIN Bullish BOF setup demonstrates how a failed breakdown at the VRZ Low can quickly shift market control from sellers to buyers.
🟢 The inability of sellers to sustain price below ₹1,798.30 created a potential reversal signal.
📈 Once the zone was reclaimed, bullish momentum expanded and delivered a 2.75% upside move with a powerful 1:12 Risk-Reward.
🎯 Failed breakdown + support reclaim + buyer momentum = high-quality BOF opportunity. 🚀📈🏆
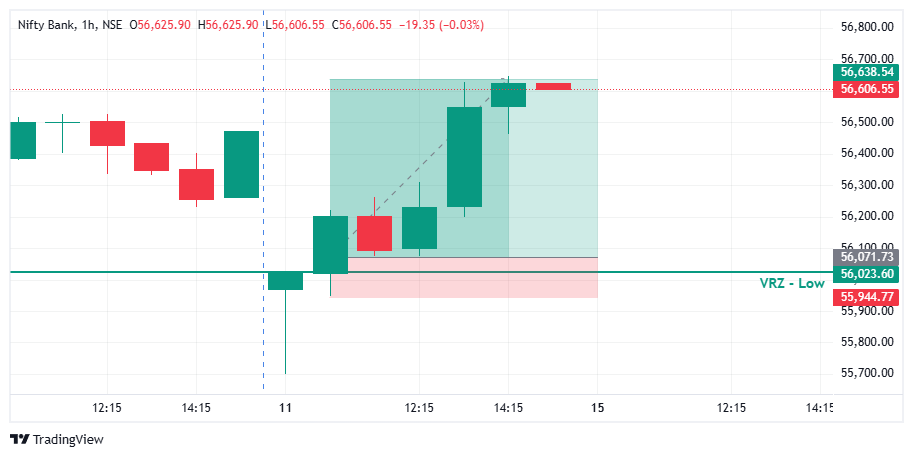

📉 Nifty Bank initially traded below the identified VRZ Low of ₹56,023.60, creating a potential breakdown scenario.
⚠️ The breakdown attracted selling pressure as traders expected the index to continue moving lower below the key support zone.
🔄 However, the bearish move failed to sustain.
📈 Price quickly reclaimed the VRZ Low, indicating that sellers were unable to maintain control beneath the support area.
🟢 The recovery above ₹56,023.60 marked a strong bullish Breakout Failure (BOF) signal.
💥 As trapped breakdown sellers started covering their short positions, fresh buying interest entered the market. This combination of short covering and bullish participation helped Nifty Bank deliver a 1.01% upside move, achieving the planned 1:4 risk-reward target.
🔍 The initial breakdown below VRZ Low suggested temporary bearish weakness.
🔄 Price rejection from lower levels demonstrated that sellers lacked sustained momentum.
📊 The reclaim of ₹56,023.60 shifted market sentiment from bearish to bullish.
🚀 Subsequent hourly candles showed strong buying momentum and consistent upward price progression.
🎯 The successful BOF setup highlighted how a failed breakdown can become a powerful bullish reversal opportunity.
Many traders initially believed:
🔻 The breakdown below support would continue.
📉 Nifty Bank would move toward lower price levels.
🐻 Sellers would maintain complete control of the market.
However, the market reacted differently.
🔄 Price reclaimed the VRZ Low at ₹56,023.60.
😮 Breakdown sellers became trapped below the support zone.
🟢 Buyers regained confidence as the index moved back above the key level.
📈 Short covering further strengthened the bullish momentum.
💭 This transition from bearish expectations to renewed buying pressure fueled the successful upside move.
🔴 Sellers initially attempted to push Nifty Bank below the VRZ Low.
🟢 Buyers absorbed selling pressure and defended the support area.
⚖️ Once price reclaimed the zone, short sellers began exiting their positions.
🚀 Fresh buyers entered as bullish confirmation strengthened.
📈 The combination of short covering and new buying accelerated the upward move.
A temporary move below support does not always indicate genuine bearish continuation. Price acceptance below the VRZ Low is important for validating a breakdown.
When sellers fail to sustain price below support, trapped short positions can contribute to a sharp bullish recovery.
The move back above ₹56,023.60 confirmed that buyers were regaining control of the market.
A clearly defined entry, stop-loss, and target helped maintain a favorable risk-reward structure throughout the trade.
✅ A breakdown below support is not automatically a bearish trade signal.
✅ Monitor price behavior around the VRZ Low for BOF confirmation.
✅ Failed breakdowns can create opportunities through short covering and fresh buying.
✅ Maintain predefined stop-loss and target levels for disciplined execution.
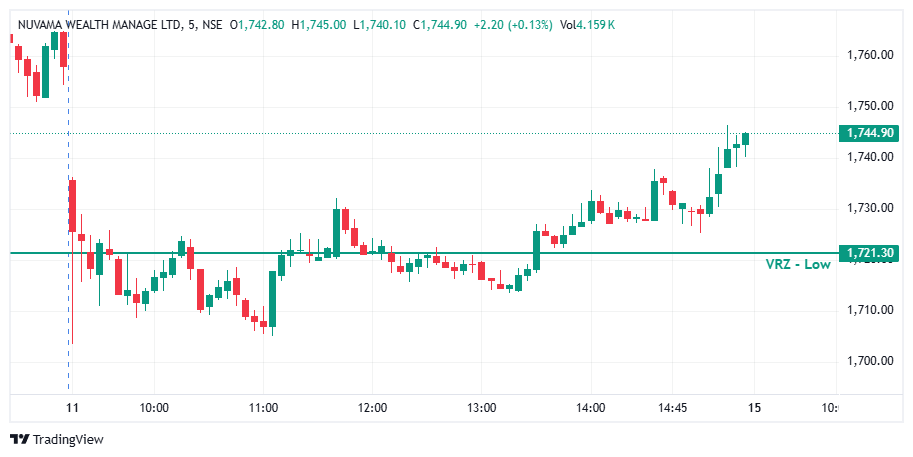

📉 NUVAMA initially broke below the ₹1,721.30 VRZ Low, creating a bearish breakdown scenario. ⚠️ However, sellers could not sustain the downside move, and price gradually started recovering from the lower levels. 🔎 This early weakness eventually turned into a potential breakdown-failure structure as buyers stepped back into control.
🎯 The key shift occurred when price recovered toward and reclaimed the ₹1,721.30 VRZ Low. 🟢 Instead of continuing below the zone, buyers established acceptance above the level. 📊 This reclaim weakened the bearish breakdown thesis and provided confirmation that the failed breakdown could develop into a bullish reversal.
🚫 The initial breakdown failed to produce sustained bearish continuation. 🔄 Once price reclaimed ₹1,721.30, the broken level started behaving more like support. 📈 Buyers gradually pushed price higher, confirming that the earlier downside move had failed to attract continued selling pressure.
🟢 After the reclaim, bullish candles began appearing with stronger follow-through. ⚡ Price moved above the earlier consolidation area and continued making higher levels. 📈 The momentum improved significantly during the later session, eventually pushing NUVAMA toward ₹1,744.90.
🎯 The critical confirmation came from the ₹1,721.30 reclaim. 🟢 Once price regained and sustained above the VRZ Low, the failed breakdown provided stronger bullish confirmation. 📊 Waiting for reclaim + acceptance + follow-through would have offered a cleaner execution signal instead of anticipating the reversal during the initial weakness.
🔒 The initial breakdown should not automatically be treated as a bearish continuation. ⚠️ When price quickly recovers and reclaims the VRZ Low, the bearish thesis needs to be reassessed. 🧭 Using the VRZ level as an invalidation reference helps traders avoid staying committed to a failed breakdown while protecting capital.
🧩 Sellers initially appeared to have control after the breakdown, but they failed to maintain downside pressure. 👀 As buyers reclaimed ₹1,721.30, market sentiment shifted from bearish continuation toward bullish reversal. 🎯 The key lesson is to recognize when the market fails to follow through on a breakdown and adapts accordingly.
📍 ₹1,721.30 became the critical decision level in this setup. 🔻 The breakdown below the VRZ Low failed, while 🔄 the subsequent reclaim triggered a shift in market structure. 📈 The sustained move above the level eventually developed into a strong bullish continuation toward ₹1,744.90.
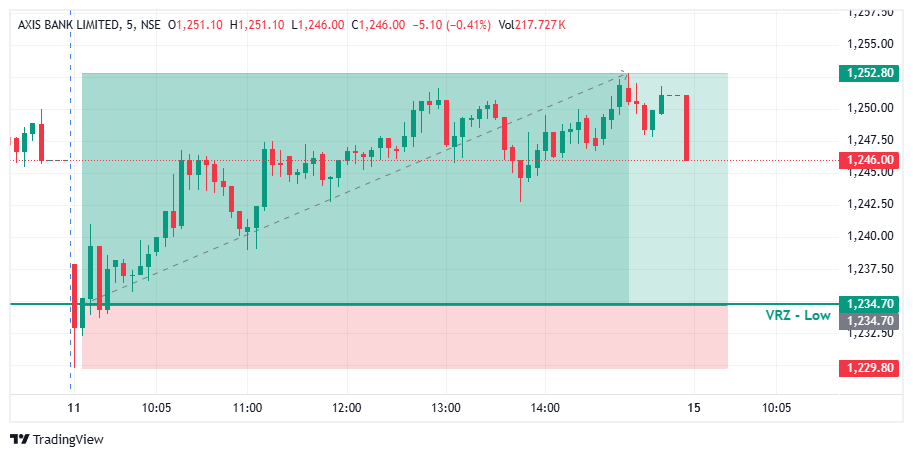

🔻 AXISBANK tested the VRZ Low, where sellers attempted to push the price below the important support zone.
🚨 However, the breakdown failed to sustain as the price quickly recovered from the lower levels.
🟢 This recovery confirmed the Breakdown Failure (BOF) setup and created a bullish intraday opportunity.
🟢 Buyers stepped in after the failed breakdown and pushed AXISBANK back above the key support zone.
📊 The recovery from the ₹1,234.70 VRZ Low showed improving buying participation.
🚀 The setup eventually delivered a strong 1.47% bullish move with a 1:3 Risk-Reward.
🔴 Sellers: Attempted to extend the breakdown below the VRZ Low.
🟡 Breakdown Traders: Faced pressure as the price failed to sustain below the support zone.
🟢 Buyers: Regained control and initiated the bullish reversal.
🎭 The initial breakdown attempt created bearish expectations.
⚠️ However, the inability to sustain below the VRZ Low weakened seller confidence.
📈 The recovery shifted market control toward buyers and supported the bullish reversal.
🎯 The important confirmation came when AXISBANK reclaimed and sustained above the ₹1,234.70 VRZ Low.
🔄 The failed breakdown signaled that selling pressure was losing strength.
⚡ Continued bullish follow-through validated the BOF setup.
🔸 🚫 Failed Breakdowns Can Trap Sellers
When price quickly reclaims support, bearish positions can come under pressure.
🔹 🎯 Support Reclaim Is Important
Moving back above the VRZ Low highlighted renewed buyer strength.
🛡️ Defined Risk Improves Trade Discipline
The VRZ Low provided a clear reference for managing risk.
⚡ Momentum Supports the Reversal
Once buyers regained control, the bullish move developed with strong follow-through.
📈 After reclaiming the VRZ Low, AXISBANK began developing a stronger intraday bullish structure.
🟢 Buyers maintained control as the price moved away from the support zone.
🚀 The improving structure supported the continuation of bullish momentum.
🔥 Buying pressure increased following the failed breakdown.
📈 Price continued moving higher from the VRZ Low and strengthened the bullish reversal.
🏆 The trade ultimately produced a 1.47% upside move with a 1:3 RR.
🔸 The setup became actionable after AXISBANK failed to sustain below the ₹1,234.70 VRZ Low.
📈 Buyers reclaimed the support zone and maintained bullish control.
⚖️ The confirmed BOF structure provided a disciplined intraday setup with defined risk and a clear 1:3 Risk-Reward opportunity.

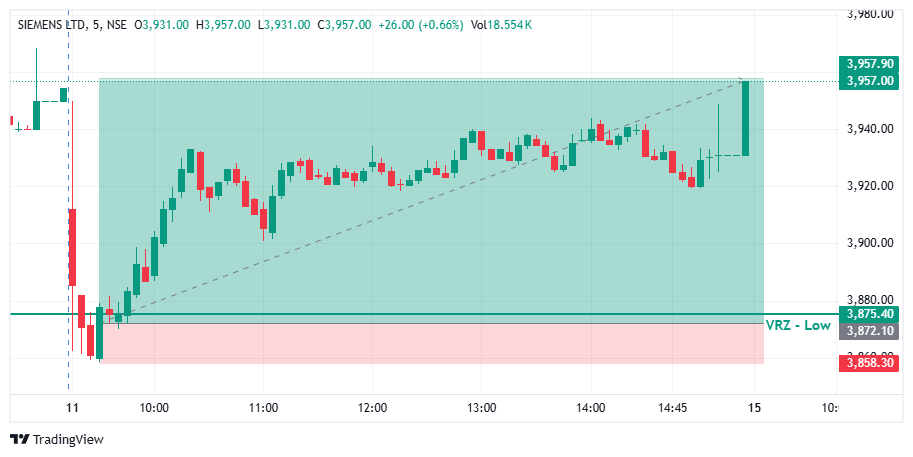

SIEMENS moved sharply below the ₹3,875.40 VRZ Low and extended toward the ₹3,858.30 area. This created an initial bearish breakdown attempt as sellers pushed price beneath the important support zone.
The breakdown failed to sustain as price recovered and reclaimed the ₹3,875.40 VRZ Low. This shift transformed the bearish breakdown attempt into a Bullish Breakout Failure (BOF) setup.
After reclaiming the VRZ Low, SIEMENS began developing a stronger bullish structure on the 5-minute chart. Price moved progressively higher as buyers started taking control of the session.
Traders who entered short during the breakdown below ₹3,875.40 were caught as price reversed back above the key zone. The failed bearish move created trapped sellers and added strength to the subsequent bullish recovery.
Following the reversal, SIEMENS maintained upward momentum and gradually formed higher price movements. The sustained recovery confirmed that buying pressure was becoming stronger after the failed breakdown.
As the bullish structure continued to develop, price advanced toward the marked ₹3,957.90 target area. The strong movement away from VRZ Low created a favorable upside opportunity.
The setup offered a clearly structured long trade around the reclaimed VRZ Low, with downside risk defined near the failed breakdown area. The substantial upside potential resulted in an impressive 1:6 Risk-Reward setup.
🎯 Clear VRZ Low rejection showed that sellers could not sustain the breakdown.
🔄 Failed breakdown confirmation transformed the bearish attempt into a bullish BOF.
🪤 Breakdown sellers became trapped as price reclaimed the key support zone.
📈 Bullish price structure strengthened with improving upward momentum.
⚡ Sustained buying pressure carried SIEMENS toward the upside objective.
💰 1:6 Risk-Reward outcome provided strong reward potential against controlled risk.
🔥 The SIEMENS setup demonstrates how a failed breakdown at VRZ Low can trigger a powerful bullish reversal. When price rejects the lower zone, reclaims the key VRZ level, and develops sustained buying momentum, the resulting BOF structure can create a high-potential intraday opportunity.
SIEMENS delivered a 2.22% bullish move following the VRZ Low Breakout Failure and successfully achieved a 1:6 RR outcome. 📈🏆 The strong recovery from the failed breakdown highlights the effectiveness of combining VRZ levels, reversal confirmation, price action, and disciplined risk management.
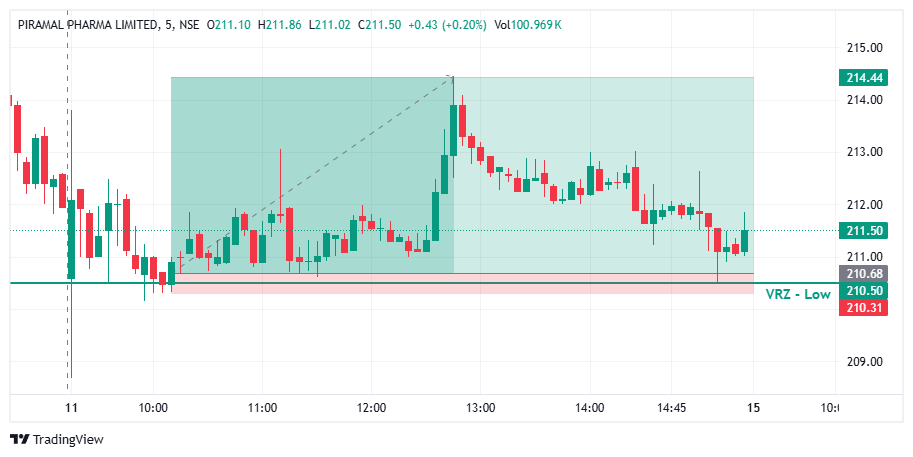

🔻 PPLPHARMA tested the VRZ Low, where sellers attempted to push the price below the important support zone.
🚨 However, the breakdown failed to sustain as the price recovered from the lower levels.
🟢 This rejection and recovery confirmed the Breakdown Failure (BOF) setup and created a bullish intraday opportunity.
🟢 Buyers stepped in after the failed breakdown and pushed PPLPHARMA back above the key support zone.
📊 The recovery from the ₹210.50 VRZ Low showed improving buying participation.
🚀 The setup eventually delivered a strong 1.78% bullish move with an impressive 1:10 Risk-Reward.
🔴 Sellers: Attempted to extend the breakdown below the VRZ Low.
🟡 Breakdown Traders: Faced pressure as the price failed to sustain below the support zone.
🟢 Buyers: Regained control and initiated a strong bullish reversal.
🎭 The initial move below the support zone created bearish expectations.
⚠️ However, the inability to sustain below the VRZ Low weakened seller confidence.
📈 The recovery shifted market control toward buyers and supported the upside reversal.
🎯 The important confirmation came when PPLPHARMA reclaimed and sustained above the ₹210.50 VRZ Low.
🔄 The failed breakdown signaled that selling pressure was losing strength.
⚡ Continued bullish follow-through validated the BOF setup.
🔸 🚫 Failed Breakdowns Can Trap Sellers
When price fails to sustain below support and quickly recovers, bearish positions can come under pressure.
🔹 🎯 Support Reclaim Is Important
Moving back above the VRZ Low highlighted renewed buyer strength.
🛡️ Defined Risk Improves Trade Discipline
The VRZ Low provided a clear reference for managing risk.
⚡ Momentum Supports the Reversal
Once buyers regained control, the bullish move developed with strong follow-through.
📈 After reclaiming the VRZ Low, PPLPHARMA began developing a stronger intraday bullish structure.
🟢 Buyers maintained control as the price moved away from the support zone.
🚀 The improving structure supported the continuation of bullish momentum.
🔥 Buying pressure increased following the failed breakdown.
📈 Price moved strongly higher from the VRZ Low, confirming the bullish reversal.
🏆 The trade ultimately delivered a 1.78% upside move with a 1:10 RR.
🔸 The setup became actionable after PPLPHARMA failed to sustain below the ₹210.50 VRZ Low.
📈 Buyers reclaimed the support zone and maintained bullish control.
⚖️ The confirmed BOF structure provided a disciplined intraday setup with defined risk and a strong 1:10 Risk-Reward opportunity.