
Select a trading day to view all Scanner results, chart evidence, and market explanations.
3 Scanners Available
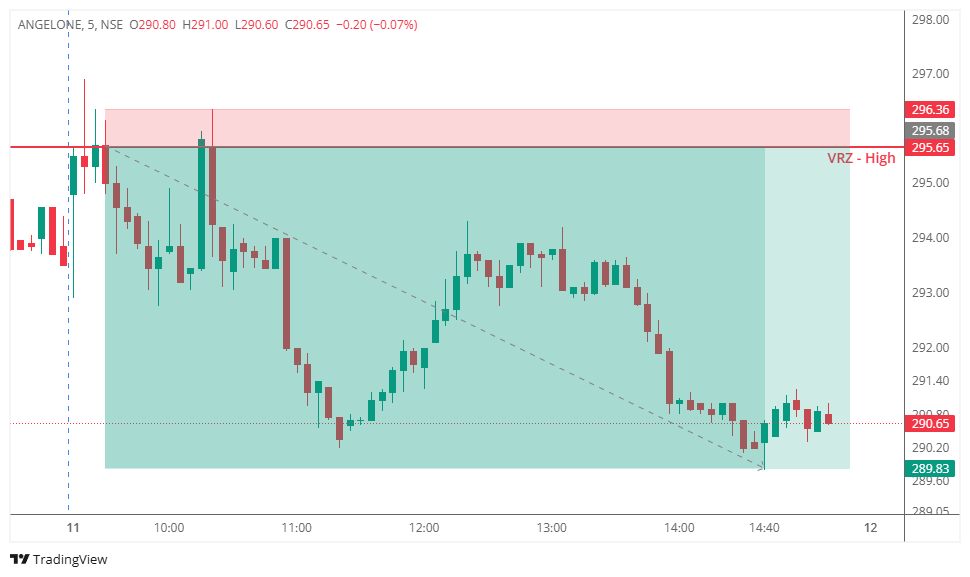

🔹 ANGELONE tested the VRZ High, with buyers attempting to push price above the resistance zone.
⚠️ The breakout failed to sustain, and price moved back below the VRZ High.
🔻 This rejection confirmed the Breakout Failure (BOF) setup and created a bearish intraday opportunity.
🔻 Following the failed breakout, sellers gained control and pushed price lower.
🔴 Price remained below the VRZ High as bearish pressure developed.
🎯 The setup delivered a 1.98% bearish move with an impressive 1:8 Risk-Reward.
🟢 Buyers: Attempted to sustain the breakout above resistance.
🟡 Breakout Traders: Became trapped when price slipped back below the VRZ High.
🔴 Sellers: Capitalized on the failed breakout and drove the downside move.
🎭 The initial breakout created bullish expectations among market participants.
🚨 Once price failed to hold above the VRZ High, bullish confidence weakened.
📉 Trapped buyers and increasing selling pressure helped accelerate the bearish reversal.
🚫 Failed Breakouts Can Reverse Sharply
A breakout without sustained follow-through can quickly turn into a bearish reversal.
🎯 Resistance Rejection Signals Weakness
The rejection from ₹295.65 highlighted weakening buyer control.
🛡️ Defined Zones Improve Risk Control
The VRZ High provided a clear reference for setup invalidation.
⚡ Strong Momentum Drives Follow-Through
Once sellers gained control, the downside move expanded significantly.
📉 After the rejection, ANGELONE developed a clear downward price structure.
🔻 Lower price levels formed as sellers maintained pressure.
🐻 The bearish structure remained intact and supported continued downside movement.
🚨 Selling pressure increased as price moved further away from the VRZ High.
📉 The failed breakout transitioned into sustained bearish momentum.
🎯 This resulted in a 1.98% downside move and a remarkable 1:8 RR outcome.
🔸 The trade developed after ANGELONE failed to sustain the breakout above the VRZ High.
📉 Sellers maintained control and extended the bearish move.
🏆 The setup produced a 1.98% bearish move with an exceptional 1:8 Risk-Reward.

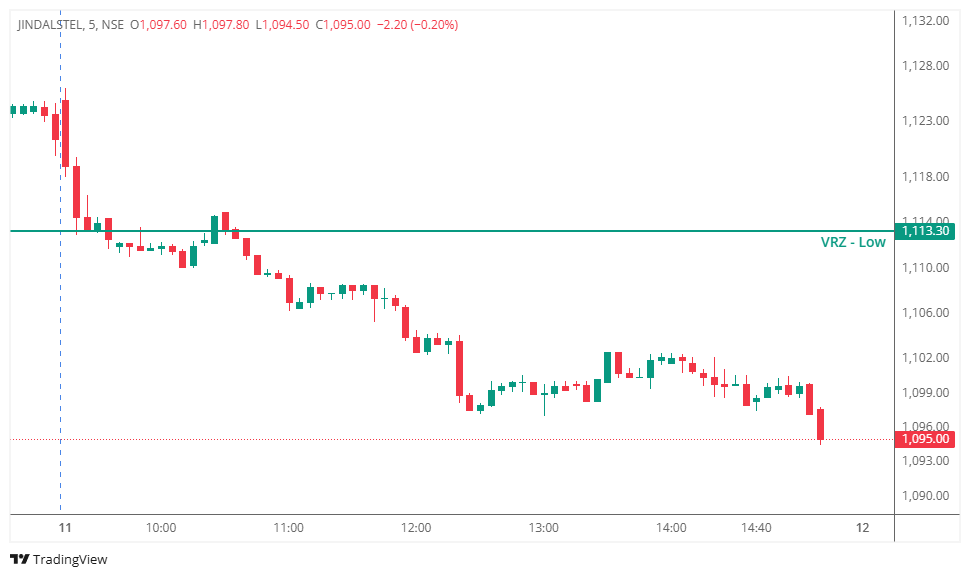

JINDALSTEL opened with strong selling pressure and quickly moved below the VRZ Low at ₹1,113.30, indicating weakness around the support zone.
Price later attempted to reclaim the VRZ Low, creating a potential BOF long setup under the Logical Trading System (LTS). The reclaim suggested that buyers could potentially trigger a reversal from the support zone.
However, the broader market structure remained bearish.
The reclaim of the VRZ Low initially offered a sign that selling pressure might be weakening.
However, buyers failed to sustain the recovery above the zone. Price struggled to establish a strong bullish structure, while sellers continued to dominate the session.
The inability to build higher highs after the reclaim became an important indication that the reversal lacked strength.
The BOF long trade was triggered following the attempted reclaim of the VRZ Low.
Although the setup was valid according to the predefined rules, bullish follow-through remained weak.
🔻 Sellers regained control.
🔻 Price moved back below the reversal zone.
🔻 Bearish momentum continued to expand.
As the setup became invalid, the predefined stop loss was triggered.
The controlled exit prevented the failed reversal from turning into an uncontrolled loss.
The BOF setup failed because buyers could not maintain control after reclaiming the support zone.
❌ Weak bullish continuation after the reclaim.
❌ Buyers failed to establish sustained higher highs.
❌ Sellers repeatedly pressured the price.
❌ The broader intraday structure remained bearish.
❌ Price eventually broke back below the VRZ Low.
These signals indicated that the attempted bullish reversal lacked sufficient strength.
The chart highlights a failed BOF long attempt followed by continued bearish price action.
🔻 Sellers initially broke below the VRZ Low.
🟢 Buyers attempted to reclaim the support level.
🟡 The recovery lacked strong bullish momentum.
🔴 Sellers regained control after the failed reclaim.
📉 Price continued trading below the VRZ Low and eventually moved toward fresh intraday lows.
This demonstrates that a support reclaim alone is not enough to confirm a sustainable reversal.
⚠️ Every BOF setup carries a probability of failure.
📊 A valid setup can still produce a controlled losing trade.
🔎 Strong follow-through is essential after a BOF trigger.
🛡️ Predefined stop losses help protect capital when the reversal thesis becomes invalid.
🎯 Trading consistency comes from executing the process rather than predicting every market move.
This trade followed the predefined rules of the Logical Trading System (LTS) and remained a valid execution despite the loss.
Professional traders understand that:
✅ A valid setup does not guarantee a profitable outcome.
✅ Losses are part of probability-based trading.
✅ Following the system is more important than forcing a trade to work.
✅ Emotional discipline helps maintain consistency across multiple trades.
Capital protection remains the priority when a BOF setup fails.
✔️ The trade was based on a predefined setup.
✔️ Risk was established before execution.
✔️ The stop loss was respected when the reversal failed.
✔️ No averaging down was required.
✔️ Capital remained available for future high-probability opportunities.
Controlled losses are a normal component of disciplined trading.
🌍 Markets constantly test patience, discipline, and risk management.
⚠️ This JINDALSTEL BOF Failure demonstrates that reclaiming a support level does not automatically create a successful bullish reversal. Buyers need strong confirmation and sustained follow-through to maintain control.
📉 When sellers continue dominating the broader market structure, a weak reclaim can quickly turn into another bearish continuation.
🛡️ Professional traders focus on managing risk and following predefined rules rather than trying to predict every reversal.
💪 Trust the process, respect the stop loss, and allow disciplined execution—not emotions—to guide every trading decision.
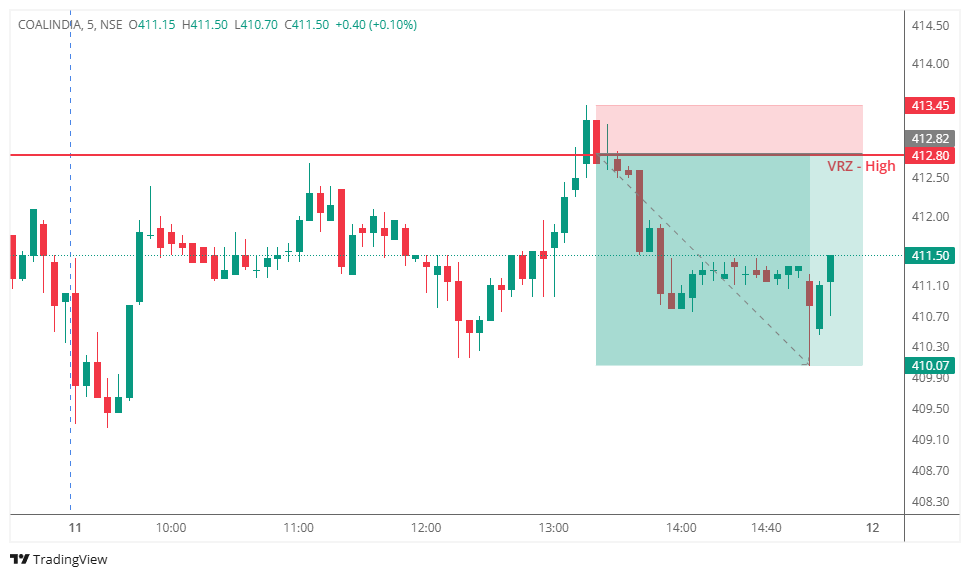

🔹 COALINDIA tested the VRZ High, where buyers attempted to sustain a breakout above the resistance zone.
⚠️ The breakout failed as price moved back below the VRZ High, signaling weakening bullish momentum.
🔻 The rejection confirmed the bearish BOF setup and opened an intraday short opportunity.
📉 Following the failed breakout, sellers quickly gained control and pushed price lower.
🔴 Price remained below the VRZ High, maintaining bearish pressure.
🎯 The setup delivered a 0.67% bearish move with a 1:4 Risk-Reward.
🟢 Buyers: Attempted to sustain the breakout above ₹412.80.
🟡 Breakout Traders: Became trapped as price slipped back below the VRZ High.
🔴 Sellers: Took control after the rejection and drove the downside move.
🎭 The breakout initially created bullish expectations around the resistance zone.
🚨 When price failed to hold above the VRZ High, bullish momentum weakened and selling pressure increased.
📉 The shift in control supported the bearish continuation.
🚫 Failed Breakouts Signal Weakness
A breakout that cannot sustain above resistance can quickly reverse lower.
🎯 Resistance Rejection Matters
The rejection from the VRZ High highlighted weakening buyer control.
🛡️ Defined Risk Improves Execution
The VRZ High provided a clear reference for trade invalidation.
⚡ Momentum Drives Follow-Through
Once sellers gained control, the downside move extended toward the lower part of the zone.
📊 After the rejection, COALINDIA developed a bearish intraday structure with lower price levels.
🔻 Price continued trading below the VRZ High, keeping sellers in control.
📉 The sustained downside structure supported the continuation of the BOF trade.
🔸 The setup became actionable after COALINDIA failed to sustain the breakout above the ₹412.80 VRZ High.
📉 Sellers maintained downside pressure following the rejection.
🏆 The trade delivered a 0.67% bearish move with a strong 1:4 Risk-Reward.
