
Select a trading day to view all Scanner results, chart evidence, and market explanations.
3 Scanners Available
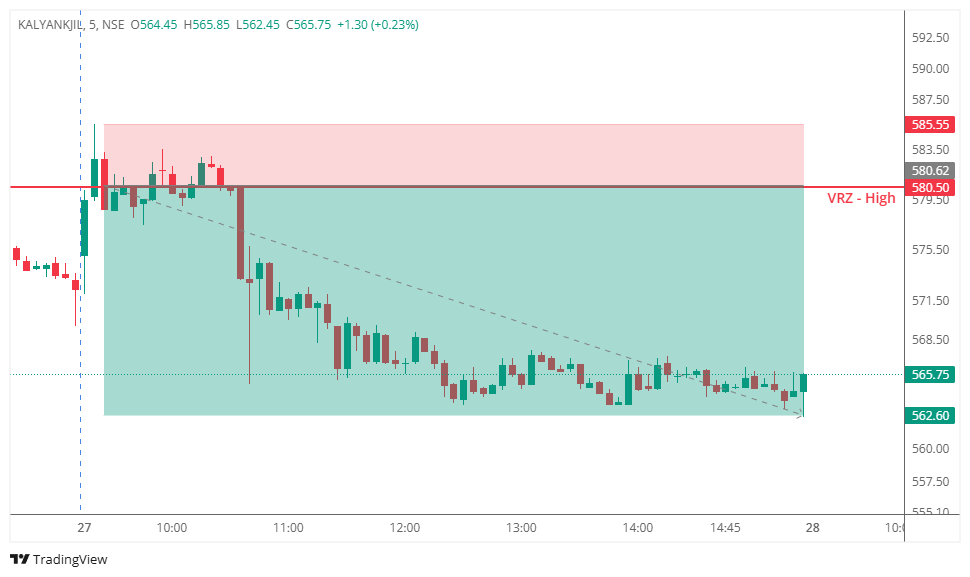

🔹 KALYANKJIL tested the VRZ High and briefly attempted to sustain above the resistance zone.
⚠️ The breakout failed as price rejected the VRZ High and moved back below the key level.
📉 This rejection trapped breakout buyers and shifted short-term market control toward sellers.
🔥 Strong selling pressure followed, pushing the stock into a sustained bearish move throughout the session.
🎯 The confirmed BOF setup delivered a 3.10% bearish move with a solid 1:3 Risk-Reward.
🟡 Traders initially expected the breakout above the VRZ High to continue higher.
🟠 Buyers attempted to establish control above the resistance zone.
🔴 The breakout quickly lost momentum and failed to hold.
💥 Breakout buyers became trapped as price moved back below the VRZ High.
📉 Sellers stepped in aggressively and gradually dominated the session.
🎯 The failed breakout transformed into a successful BOF bearish reversal.
🔸 1️⃣ Failed Breakouts Can Create Strong Reversals
When price fails to sustain above resistance, trapped buyers may exit their positions, adding fuel to the bearish move.
🔹 2️⃣ Confirmation Strengthens Trade Entries
Waiting for price to reject the VRZ High and confirm the BOF helped avoid premature short entries.
🟢 3️⃣ Defined Risk Supports Better Execution
The VRZ High provided a clear invalidation point, allowing traders to manage risk while targeting a 1:3 RR.
🟣 4️⃣ Follow the Confirmed Price Action
Instead of predicting the reversal, waiting for confirmation allowed traders to align with the developing bearish momentum.

📊 KALYANKJIL showcased a clean Breakout Failure at the VRZ High.
🚨 The failed breakout shifted momentum from buyers to sellers, resulting in sustained downside price action.
🎯 The setup highlighted the importance of confirmation, disciplined risk management, and following market structure.
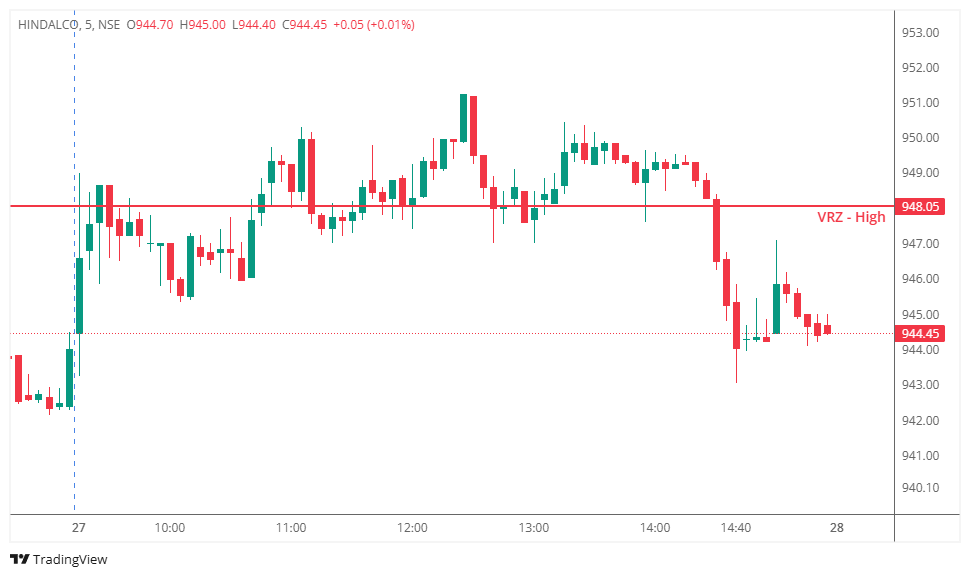

The market opened with healthy momentum, and HINDALCO gradually climbed towards the VRZ High. As price tested the resistance zone, traders anticipated a potential rejection and looked for a Breakout Failure (BOF) confirmation.
Initially, the price action behaved according to the BOF strategy, creating a high-probability short opportunity.
Price moved above the VRZ High level of ₹948.05, attracting breakout buyers. Shortly afterward, the stock slipped back below the VRZ level, creating the impression that the breakout had failed.
The BOF sell setup was triggered as the rejection candle suggested weakening bullish momentum.
However, the expected selling pressure never expanded. Buyers quickly absorbed the supply near the VRZ zone and regained control of the market.
Instead of continuing lower, the stock reclaimed the trigger level, invalidating the bearish setup and eventually reaching the predefined stop loss.
Interestingly, after stopping out the trade, the market later resumed its bearish move and declined significantly. This is a classic reminder that timing is just as important as market direction.
The setup failed because the market did not immediately confirm bearish momentum after the entry.
Several warning signs appeared:
❌ Buyers defended the breakout area aggressively.
❌ Price failed to create consecutive bearish candles after entry.
❌ Selling momentum remained weak.
❌ The VRZ level failed to act as immediate resistance.
❌ Price reclaimed the trigger level before the downside momentum developed.
Once these conditions appeared, the probability of the BOF succeeding reduced significantly.
The chart clearly shows that:
📌 Breakout buyers initially pushed price above resistance.
📌 Sellers attempted to reject the breakout.
📌 The rejection lacked follow-through.
📌 Buyers regained short-term control and triggered the stop loss.
📌 Only after removing weak short positions did fresh selling pressure enter the market.
This sequence is commonly known as a failed BOF followed by delayed trend continuation, a situation that every price action trader experiences sooner or later.
Many traders judge a trade solely by its outcome.
Professional traders judge a trade by whether the setup was executed according to the trading plan.
This was a valid BOF setup.
The loss does not mean the strategy failed.
It simply means the market chose a lower-probability outcome on this particular occasion.
A BOF Short becomes vulnerable when:
❌ Price quickly reclaims the VRZ High.
❌ Selling pressure disappears after the rejection.
❌ Buyers continue forming higher lows.
❌ Volume fails to support the breakdown.
❌ Momentum shifts back in favor of buyers.
✅ Every trading strategy has losing trades.
✅ Stop losses are part of professional trading.
✅ Capital protection is more important than avoiding losses.
✅ One disciplined loss is far better than one emotional mistake.
✅ Following the process consistently builds long-term profitability.
✅ A failed BOF often becomes valuable market information for future trades.
This trade followed every rule of the Logical Trading System (LTS) and therefore qualifies as a good trade, despite the financial loss.
Professional traders never evaluate success based on one trade alone.
Instead, they focus on:
✔️ Executing the setup correctly.
✔️ Respecting predefined risk.
✔️ Accepting losses without hesitation.
✔️ Remaining emotionally neutral.
Trading is a game of probabilities—not certainty. A controlled loss is simply the cost of doing business in the financial markets.
Successful traders survive because they manage risk—not because they win every trade.
In this setup:
Protecting capital allows traders to participate in the next high-probability opportunity with confidence.
Losses are unavoidable in every trading system.
The goal is not to eliminate losses, but to ensure they remain small, planned, and controlled.
This HINDALCO BOF Failure is an excellent example of why discipline, patience, and proper risk management will always outperform emotional decision-making over the long run.
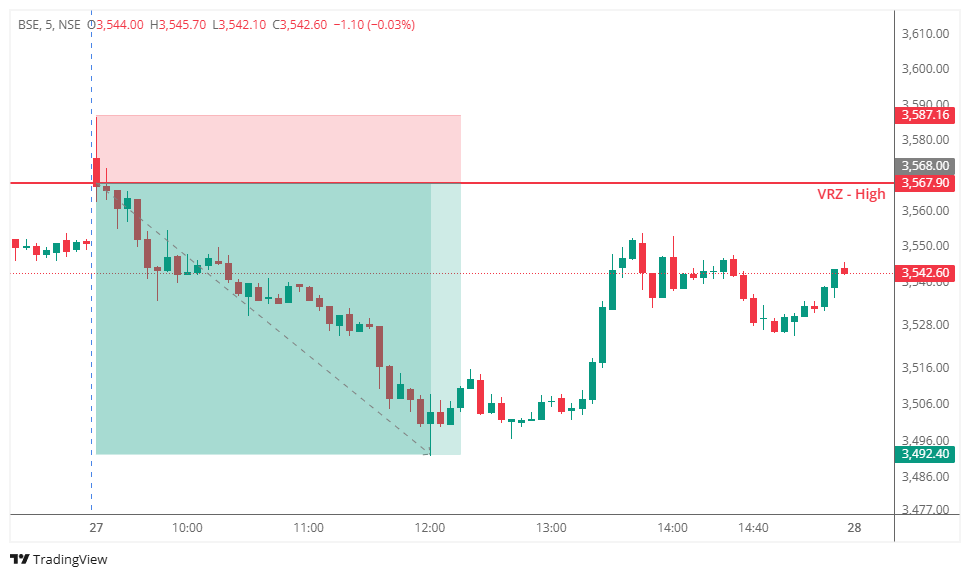

🔹 BSE tested the VRZ High and failed to sustain the breakout above the resistance zone.
⚠️ As price rejected the breakout and moved back below the VRZ High, the bullish breakout attempt became invalid.
📉 The rejection trapped breakout buyers and created increasing selling pressure.
🔥 Sellers gradually took control, driving price lower and forming a clear bearish intraday structure.
🎯 The confirmed BOF setup delivered a 2.12% bearish move with an excellent 1:4 Risk-Reward.
🟡 Traders initially expected the breakout above the VRZ High to continue higher.
🟠 Buyers attempted to maintain control above resistance.
🔴 However, the breakout failed and price quickly moved back below the zone.
⬇️ Breakout buyers became trapped.
💥 Selling pressure increased as bullish momentum weakened.
📉 Sellers gained control and pushed price toward lower levels.
🎯 The failed breakout eventually developed into a successful BOF bearish reversal.
1️⃣ Failed Breakouts Can Trigger Strong Reversals
When price fails to sustain above a major resistance level, trapped buyers can accelerate the downside move through position exits.
2️⃣ Confirmation Improves Trade Quality
Waiting for price to reject the breakout and accept back below the VRZ High helped confirm the BOF setup.
3️⃣ Defined Risk Supports Better Execution
Using the VRZ High as the invalidation level provided a logical risk point while allowing the trade to achieve a 1:4 Risk-Reward.
4️⃣ Follow Price Action, Not Predictions
Instead of anticipating the reversal, waiting for BOF confirmation allowed traders to align with the developing bearish momentum.
📊 BSE showcased a clean Breakout Failure at the VRZ High.
🚨 The failed breakout shifted market control from buyers to sellers, creating a sustained bearish move.
🎯 Patience, confirmation, and disciplined risk management helped capture a 2.12% intraday move with a strong 1:4 RR.