
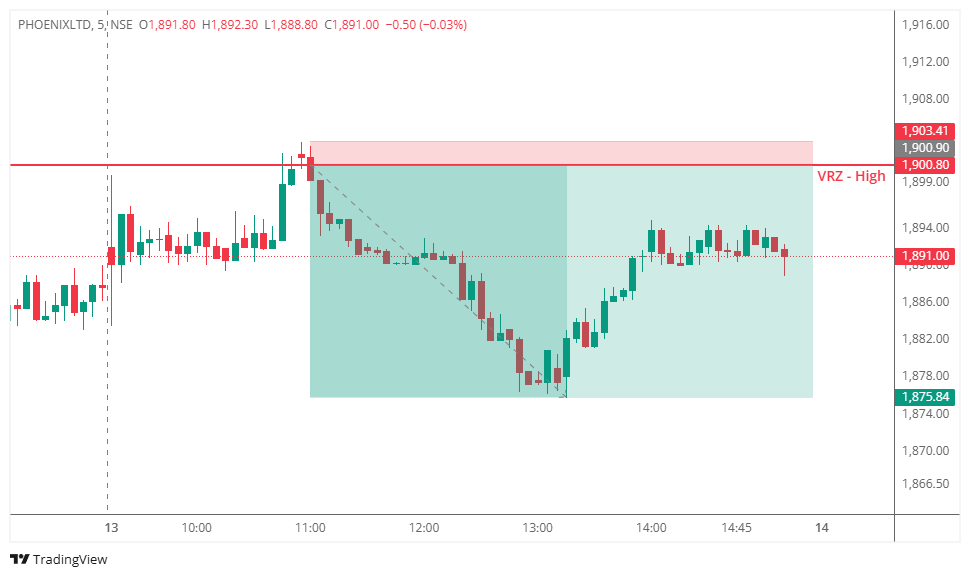

🔹 PHOENIXLTD tested the VRZ High, with buyers attempting to sustain a breakout above the resistance zone.
⚠️ The breakout failed to hold as price moved back below ₹1,900.80.
🔻 This rejection confirmed the bearish Breakout Failure (BOF) setup.
🔻 Sellers gained control immediately after the failed breakout.
📊 Price gradually moved lower while remaining below the VRZ High.
🎯 The setup delivered a 1.32% bearish move with an exceptional 1:10 Risk-Reward.
🟢 Buyers: Attempted to sustain the breakout above resistance.
🟡 Breakout Traders: Became trapped when price fell back below the VRZ High.
🔴 Sellers: Used the failed breakout to take control and push price lower.
🎭 The breakout initially created bullish expectations.
🚨 Once the breakout failed, bullish confidence weakened and trapped buyers came under pressure.
📉 Fresh selling pressure accelerated the bearish reversal.
🎯 The key confirmation came when price failed to sustain above ₹1,900.80 and returned below the VRZ High.
🔻 Continued trading below the zone strengthened the bearish bias.
⚡ The developing downside momentum provided confirmation for the BOF trade.
🚫 Failed Breakouts Can Trigger Reversals
A breakout without follow-through can quickly turn bearish.
🎯 Zone Rejection Builds Confirmation
The rejection from the VRZ High highlighted weakening buyer control.
🛡️ Defined Risk Improves Discipline
The VRZ High provided a clear invalidation reference.
⚡ Momentum Can Expand the Move
Once sellers took control, the downside move extended strongly.
📉 Following the rejection, PHOENIXLTD formed a bearish sequence of lower highs and lower lows.
🔻 Price remained below the VRZ High as sellers maintained control.
🐻 The bearish structure supported continued downside momentum.
🚨 Selling pressure increased as price moved away from the VRZ High.
📉 The failed breakout developed into a sustained bearish move.
🏆 Strong follow-through produced a 1.32% downside move with an impressive 1:10 RR.
🔸 The trade became actionable after PHOENIXLTD failed to sustain the breakout above ₹1,900.80.
📉 Sellers maintained control as price continued lower.
⚖️ The confirmed BOF structure offered a disciplined setup with clearly defined risk.