
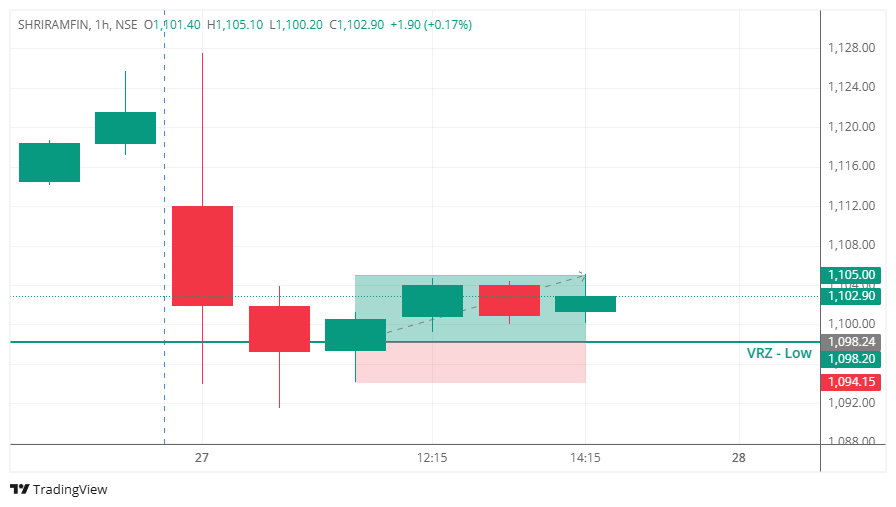

🔻 SHRIRAMFIN moved lower toward the VRZ Low at ₹1,098.20 after a strong bearish move.
⚠️ Sellers attempted to push price below the key support zone.
❌ However, the breakdown failed to sustain as sellers could not maintain control below the VRZ Low.
🟢 Buyers stepped in around the support area and pushed price back above the key zone.
📈 Subsequent 1-hour candles showed improving bullish momentum.
🔄 The failed breakdown trapped sellers and shifted short-term control toward buyers.
🚀 Price continued higher from the rejection zone, delivering a 0.62% bullish move with a 1:2 RR.
🔎 Price approached the VRZ Low following a sharp decline.
🔻 Sellers attempted to extend the downside through ₹1,098.20.
⚠️ The breakdown lacked follow-through and quickly lost momentum.
🟢 Buyers defended the VRZ Low and initiated a recovery.
📈 Price reclaimed the key zone as bullish pressure increased.
🔄 Follow-through buying confirmed the failed breakdown.
🎯 The stock continued higher toward the projected upside objective.
Initially, market participants could have expected:
🔴 Further downside continuation.
📉 A confirmed breakdown below ₹1,098.20.
🐻 Sellers to remain in control.
But the market narrative changed quickly.
⚠️ The breakdown failed to sustain.
😰 Breakdown sellers became trapped at lower levels.
🟢 Buyers aggressively defended the VRZ Low.
🔄 Price reclaimed the support area.
🚀 As trapped sellers exited and fresh buyers entered, bullish momentum strengthened.
🔴 Sellers initially controlled the downside move toward the VRZ Low.
🟢 Buyers absorbed selling pressure around ₹1,098.20.
⚠️ Failure to sustain below support weakened seller conviction.
🔄 Trapped short positions started covering as price moved back above the zone.
📈 Fresh buying emerged after bullish confirmation.
🚀 The combination of short covering and new buying helped drive the upside move.
🔹 Strong VRZ Low Support
The ₹1,098.20 zone attracted buying interest and prevented sustained downside continuation.
🔹 Failed Breakdown
Price attempted to break below support but could not maintain lower levels.
🔹 Bullish Reclaim
Price recovered above the VRZ Low, strengthening the reversal signal.
🔹 Momentum Confirmation
Successive bullish candles indicated improving buyer control.
🔹 Trapped Sellers
The failed breakdown forced short sellers to reconsider their positions, adding buying pressure.
🔹 Favorable Risk-Reward
The setup delivered a 0.62% upside move with a 1:2 RR.
📉 Bearish Phase: Price declined sharply toward the VRZ Low.
⚠️ Breakdown Attempt: Sellers tried to push below ₹1,098.20.
🔄 Failure Phase: The downside move failed to sustain.
🟢 Reclaim Phase: Buyers pushed price back above the support zone.
📈 Bullish Phase: Follow-through buying strengthened the reversal.
🎯 Target Phase: Price advanced toward the projected upside objective.
🎯 Watch How Price Reacts at VRZ Low
A predefined support zone can become a key decision area during a breakdown attempt.
🔍 A Breakdown Needs Follow-Through
A temporary move below support does not automatically confirm bearish continuation.
⚠️ Look for Failed Breakdown Confirmation
When price quickly reclaims the support zone, the bearish setup can lose validity.
📈 Watch for Buyer Strength
Bullish candles following a failed breakdown can provide confirmation of improving demand.
⚡ Trapped Sellers Can Fuel the Reversal
When a breakdown fails, short sellers may exit, adding fuel to the upside move.
🛡️ Keep Risk Defined
A clear invalidation level helps maintain disciplined trade execution.
🎯 Identify the VRZ Low before price reaches the zone.
🔍 Observe whether sellers can sustain a move below support.
🟢 Look for strong buyer response after a failed breakdown.
⚠️ Confirm the reclaim before considering a bullish entry.
📊 Track momentum changes around key VRZ levels.
🛡️ Set a clear invalidation point before entering.
💰 Maintain a favorable risk-reward structure with disciplined risk management.