
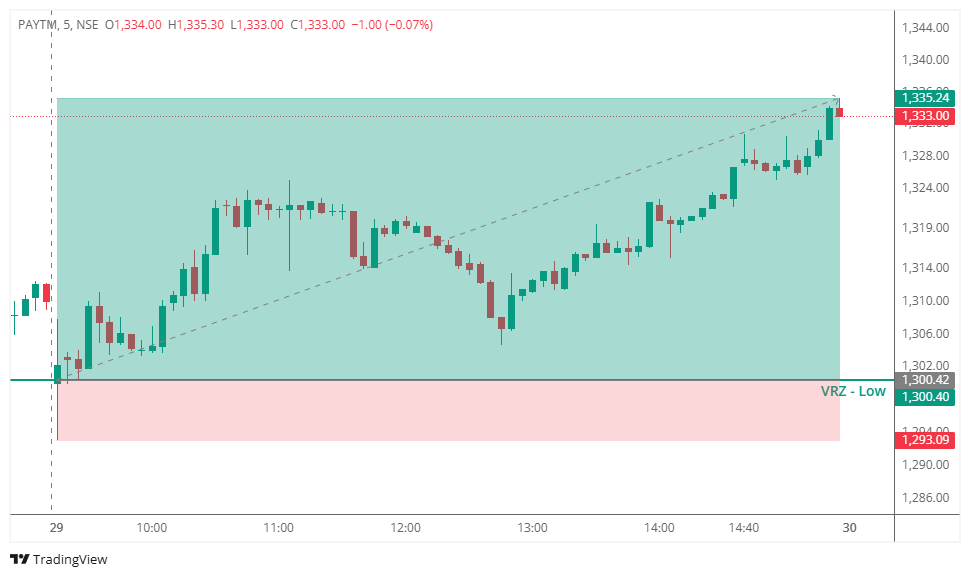

🔹 PAYTM tested the VRZ Low, with sellers attempting to push price below the key support zone.
⚠️ However, the breakdown failed to sustain as price reclaimed the VRZ Low and buyers stepped back into the market.
🔄 This failure of bearish momentum created a potential Breakdown Failure (BOF) setup and signaled a shift in short-term market control.
📈 After the breakdown failure, bullish momentum gradually strengthened.
🟢 Buyers gained control as price moved higher from the VRZ Low and continued forming a bullish intraday structure.
🚀 The confirmed BOF setup eventually delivered a 2.68% bullish move with a 1:4 Risk-Reward.
🔴 Sellers: Initially attempted to break and sustain below the VRZ Low.
🟡 Breakdown Traders: Were trapped when price failed to continue lower and reclaimed the key zone.
🟢 Buyers: Used the failed breakdown as an opportunity to regain control and drive the recovery.
🎯 Outcome: The shift in market participation confirmed the bullish BOF setup.
🎭 The initial breakdown created bearish expectations among market participants.
🚨 When price failed to sustain below the VRZ Low, bearish confidence weakened and trapped sellers came under pressure.
📈 As price reclaimed the key level, buying momentum increased and supported the bullish reversal.
🔸Failed Breakdowns Can Trigger Reversals
A breakdown that fails to sustain below support can quickly shift momentum toward buyers.
🔹Confirmation Is Important
Waiting for price to reclaim the VRZ Low helped confirm the BOF structure instead of anticipating the reversal.
🟢 Watch for Trapped Sellers
Failed breakdowns can trap sellers and create additional buying momentum.
⚖️ Maintain Defined Risk
A clear VRZ level provides a structured reference for managing risk and trade invalidation.

🔹 Setup Confirmation: The trade became actionable after the breakdown failed and price reclaimed the VRZ Low.
🔸 Market Shift: The failed breakdown shifted control from sellers to buyers, creating a structured intraday bullish reversal opportunity.
🟢 Execution: Waiting for confirmation helped identify the reversal based on actual price action rather than prediction.
📈 Trade Outcome: The setup delivered a 2.68% bullish move with a 1:4 Risk-Reward.
⚖️ Key Takeaway: This setup highlights the importance of confirmation, disciplined execution, and effective risk management when trading BOF structures.