
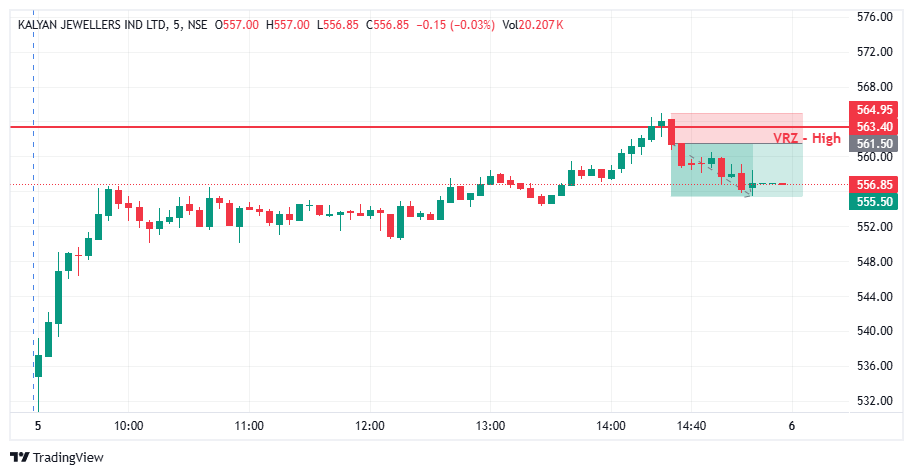

📊 KALYANKJIL traded with strong bullish momentum through the session before approaching the important ₹563.40 VRZ High resistance zone.
⚠️ Price action near this level showed an attempt to sustain higher prices and continue the upward move.
🎯 The VRZ High became a critical technical reference for identifying a potential bearish reversal.
🚨 Price tested the ₹563.40 VRZ High, briefly pushing toward ₹564.95.
🪤 However, buyers failed to maintain acceptance above the marked zone, indicating weakening bullish momentum.
🔻 Selling pressure emerged near the resistance, creating the initial signs of a failed breakout.
🎯 The rejection from the VRZ High developed into a clear Bearish Breakout Failure (BOF) structure.
⚡ As price moved back below the resistance zone, sellers began regaining control of the short-term market structure.
📉 The failed breakout signaled a shift in momentum from buyers to sellers.
🔻 Following the VRZ High rejection, KALYANKJIL eased lower through the closing candles of the session.
📊 Price slipped back toward the ₹556.85–555.50 zone as bearish pressure gradually expanded.
💥 The move confirmed the successful bearish BOF setup.
📉 The reversal generated a 1.07% downside move from the VRZ High rejection area.
⚡ The controlled price expansion highlighted the strength of the failed breakout and subsequent bearish momentum.
🏆 With disciplined risk management, the trade achieved a solid 1:2 Risk-to-Reward ratio.
🔎 The key technical development in this setup was the inability of buyers to sustain price above the ₹563.40 VRZ High.
⚡ The rejection indicated that bullish momentum weakened near resistance, allowing sellers to take control.
📉 Once price moved back below the VRZ High, bearish momentum built and extended the downside move.
🔄 This combination of resistance rejection, failed breakout, and sustained selling formed a textbook bearish BOF structure.
📍 VRZ High: ₹563.40 served as the key resistance reference.
🔺 Breakout Test: Buyers pushed toward ₹564.95 but failed to sustain the breakout.
🚨 Rejection: Strong selling pressure appeared right around the VRZ High.
🔄 BOF Confirmation: Price slipped back below the resistance area, confirming the failure.
🐻 Momentum Shift: Sellers took control as bearish momentum built.
🎯 Downside Target: Price eased toward the ₹556.85 area.
🏆 Trade Result: 1.07% downside with 1:2 RR.
🎯 A clearly defined VRZ High gave the bearish BOF setup a structured technical reference point.
⚖️ The 1:2 Risk-to-Reward outcome demonstrates how a well-placed resistance entry can deliver consistent, efficient reward.
🧠 Proper position sizing, predefined risk levels, and disciplined execution remain essential for consistent trading.