
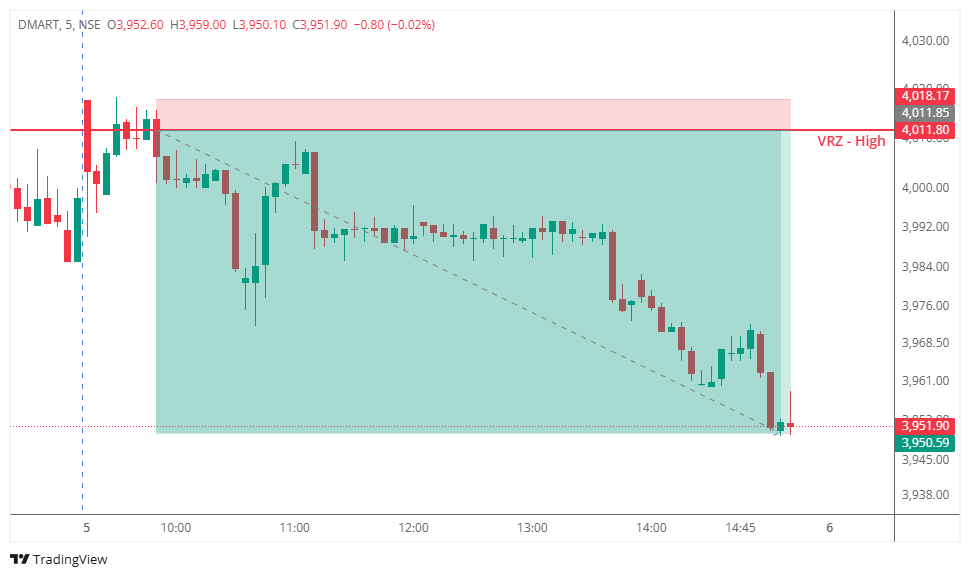

🔹 DMART tested the VRZ High, where buyers attempted to sustain a breakout above the key resistance zone.
⚠️ The breakout failed as price slipped back below the VRZ High, indicating weakening buying pressure.
🔻 This rejection confirmed the Breakout Failure (BOF) setup and created a high-probability bearish intraday opportunity.
📉 After the failed breakout, sellers gradually took control and maintained consistent downside momentum.
🔴 Price continued trading below the VRZ High, confirming the bearish trend throughout the session.
🎯 The confirmed BOF setup delivered a 1.53% bearish move with an outstanding 1:9 Risk-Reward.
🟢 Buyers: Attempted to hold the breakout above the VRZ High.
🟡 Breakout Traders: Were trapped when price slipped back below the resistance level.
🔴 Sellers: Dominated the session after the rejection and maintained strong bearish control.
📈 The initial breakout encouraged bullish participation and expectations of further upside.
🚨 As the breakout failed, trapped buyers exited their positions while fresh selling pressure entered the market.
📉 This shift in sentiment strengthened the bearish continuation.
⭐ Failed Breakouts Can Trigger Strong Reversals
A breakout that cannot sustain above resistance often results in sharp bearish moves.
✅ Wait for Confirmation
The rejection below the VRZ High confirmed seller dominance before entry.
🎯 Maintain Defined Risk
Using the VRZ High as the invalidation level supported disciplined trade execution.
🚀 Trade with Confirmed Momentum
Following confirmed price action improves the probability of successful BOF trades.
📊 Once price moved below the VRZ High, the stock formed a sequence of lower highs and lower lows.
🔻 The bearish market structure remained intact, supporting the continuation of the trade.
📉 Every recovery attempt faced selling pressure near resistance, keeping sellers firmly in control.
⚡ Continuous lower swing highs confirmed that bearish momentum remained intact until the trade reached its target.
🛡️ The VRZ High acted as a clear invalidation level, allowing traders to define risk before entering.
📊 Maintaining a favorable 1:9 Risk-Reward ensured disciplined trade management throughout the session.

🔸 The trade became actionable after price failed to sustain above the VRZ High and confirmed the breakout failure.
📉 Sellers controlled the session with a clean and disciplined bearish trend.
🏆 The setup delivered a 1.53% bearish move with an impressive 1:9 Risk-Reward.
⚖️ Following the confirmed BOF setup helped maximize the trade opportunity.