
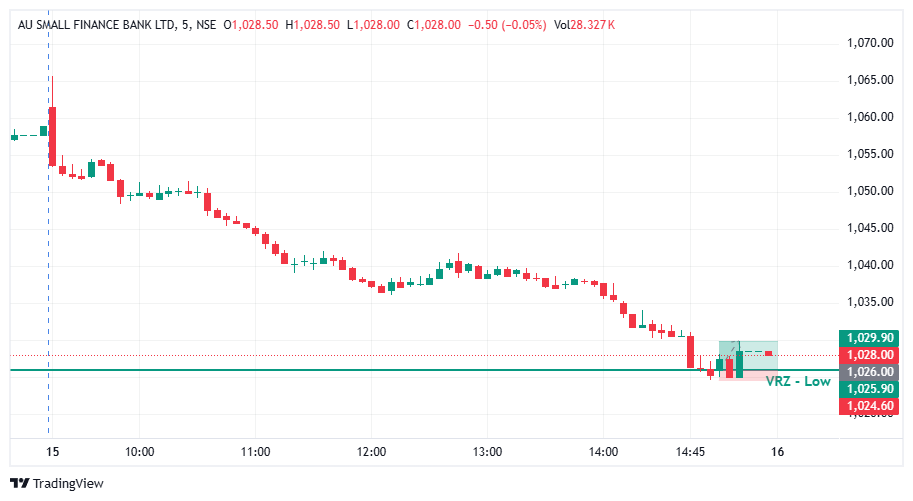

📊 AUBANK remained under sustained selling pressure throughout the session before approaching the ₹1,025.90 VRZ Low.
⚠️ The extended bearish trend brought price into an important support zone, where a potential breakdown failure could develop.
🎯 The VRZ Low became the key technical level for identifying a possible bullish reversal.
🔻 Price moved toward and briefly below the ₹1,025.90 VRZ Low, indicating an attempt by sellers to continue the downside momentum.
🪤 However, the breakdown failed to gain sustained follow-through.
📈 Buyers began absorbing selling pressure near the support zone, creating the foundation for a potential Bullish BOF setup.
🎯 The recovery back above the VRZ Low indicated a shift in short-term market structure.
⚡ Sellers were unable to maintain control below the support level, while buyers reclaimed the marked zone.
📊 This failed breakdown and subsequent reclaim created a clear Bullish Breakout Failure (BOF) opportunity.
🚀 Following the VRZ Low rejection, AUBANK started recovering from the session lows.
🟢 The bullish price action indicated improving demand and a shift away from the immediate bearish momentum.
💥 Price continued higher toward the ₹1,029.90 area, completing the successful reversal setup.
🔎 The key strength of this setup was the failed breakdown below the VRZ Low after a prolonged bearish move.
⚡ When sellers failed to sustain price below support, buyers stepped in and pushed the stock back above the marked level.
📈 The reclaim of the VRZ Low helped confirm the bullish momentum shift and supported the subsequent upside move.
🔹 VRZ Low: ₹1,025.90 acted as the primary support reference.
🔹 Bearish Pressure: Sellers dominated most of the trading session.
🔹 Failed Breakdown: Price could not sustain weakness below the VRZ Low.
🔹 Bullish Reversal: Buyers reclaimed the key support zone.
🔹 Price Expansion: The move extended toward ₹1,029.90.
🔹 Trade Outcome: 0.38% upside with 1:2 RR.
🎯 A clearly defined VRZ Low provided an important reference point for managing the bullish BOF setup.
⚖️ The 1:2 Risk-to-Reward outcome demonstrates the value of combining technical confirmation with disciplined trade management.
🧠 Proper position sizing and predefined risk remain essential when trading Breakout Failure opportunities.